Bikepacking in Australia offers the potential for an epic pedal-powered adventure. But with such a vast expanse to explore, where do you start with choosing a route?
Sydney and Melbourne are two of Australia’s best-known cities – so what about a bikepacking trip between the two? Is it feasible?!
Step in long distance cyclist and Epic Road Rides community contributor, Ollie Smith. In this article he shares his experience of cycling from Melbourne to Sydney on a bikepacking trip with his partner, Laura. Choosing to head up into the Victorian Alps around Melbourne, Ollie’s 1,400 kilometre route offered up a variety of landscapes and a mix of terrain over 10 days of riding. He tells us it included some of the best gravel cycling he’s ever done!
If sun-baked vistas, sweeping coastal roads and jaw-dropping scenery at every turn sound like your thing, read on for tips to plan your own Melbourne to Sydney bikepacking trip.

Ollie Smith has been riding bikes his whole life. Aside from racing on the road, gravel, and cyclocross circuit across the UK and Europe, Ollie has tried his hand at ultra racing and plenty of long distance bikepacking trips.
Ollie’s passion for cycling extends to his working life, too, carving a career as a cycling writer, journalist, and film maker - as well as co-producing Mitch Docker’s ‘Life In The Peloton’ podcast. When he’s not in the saddle, you can probably find him thinking about bikes, cycling, and his next two wheeled adventure.
Always check current travel information and advice. For visitors from the UK, the UK government travel information pages are here.
Contents of this article
This Melbourne to Sydney cycling guide is jam-packed with useful information and handy tips. To help you find your way, we’ve split this article into multiple parts. Here’s what you can expect:
- Part 1: Overview
- Part 2: Highlights
- Part 3: Itinerary breakdown
- Part 4: Planning
- Part 5: Insider tips
Part 1: An overview of cycling Melbourne to Sydney
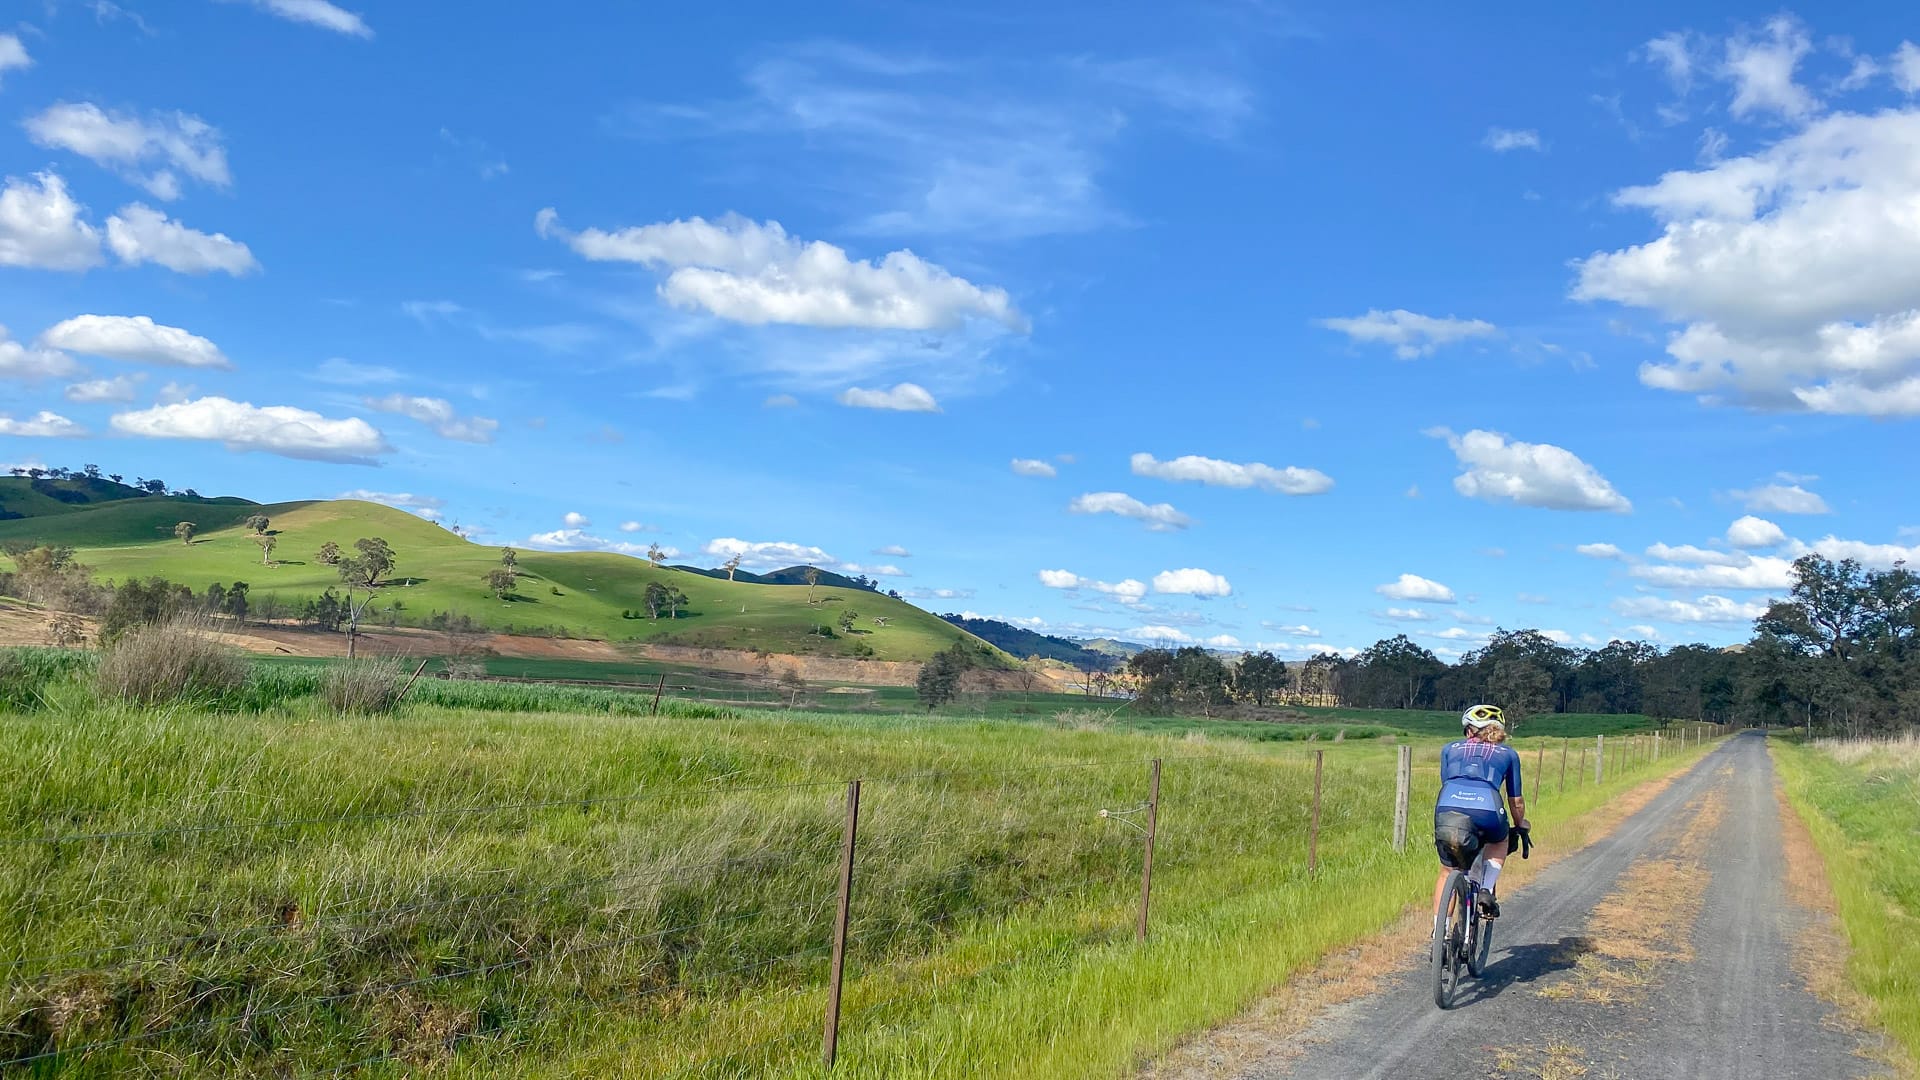
Our 10 day Australian bikepacking trip from Melbourne to Sydney covered 1,400 kilometres with roughly a 50/50 split between asphalt and gravel. The total elevation gain was just over 15,500 metres.
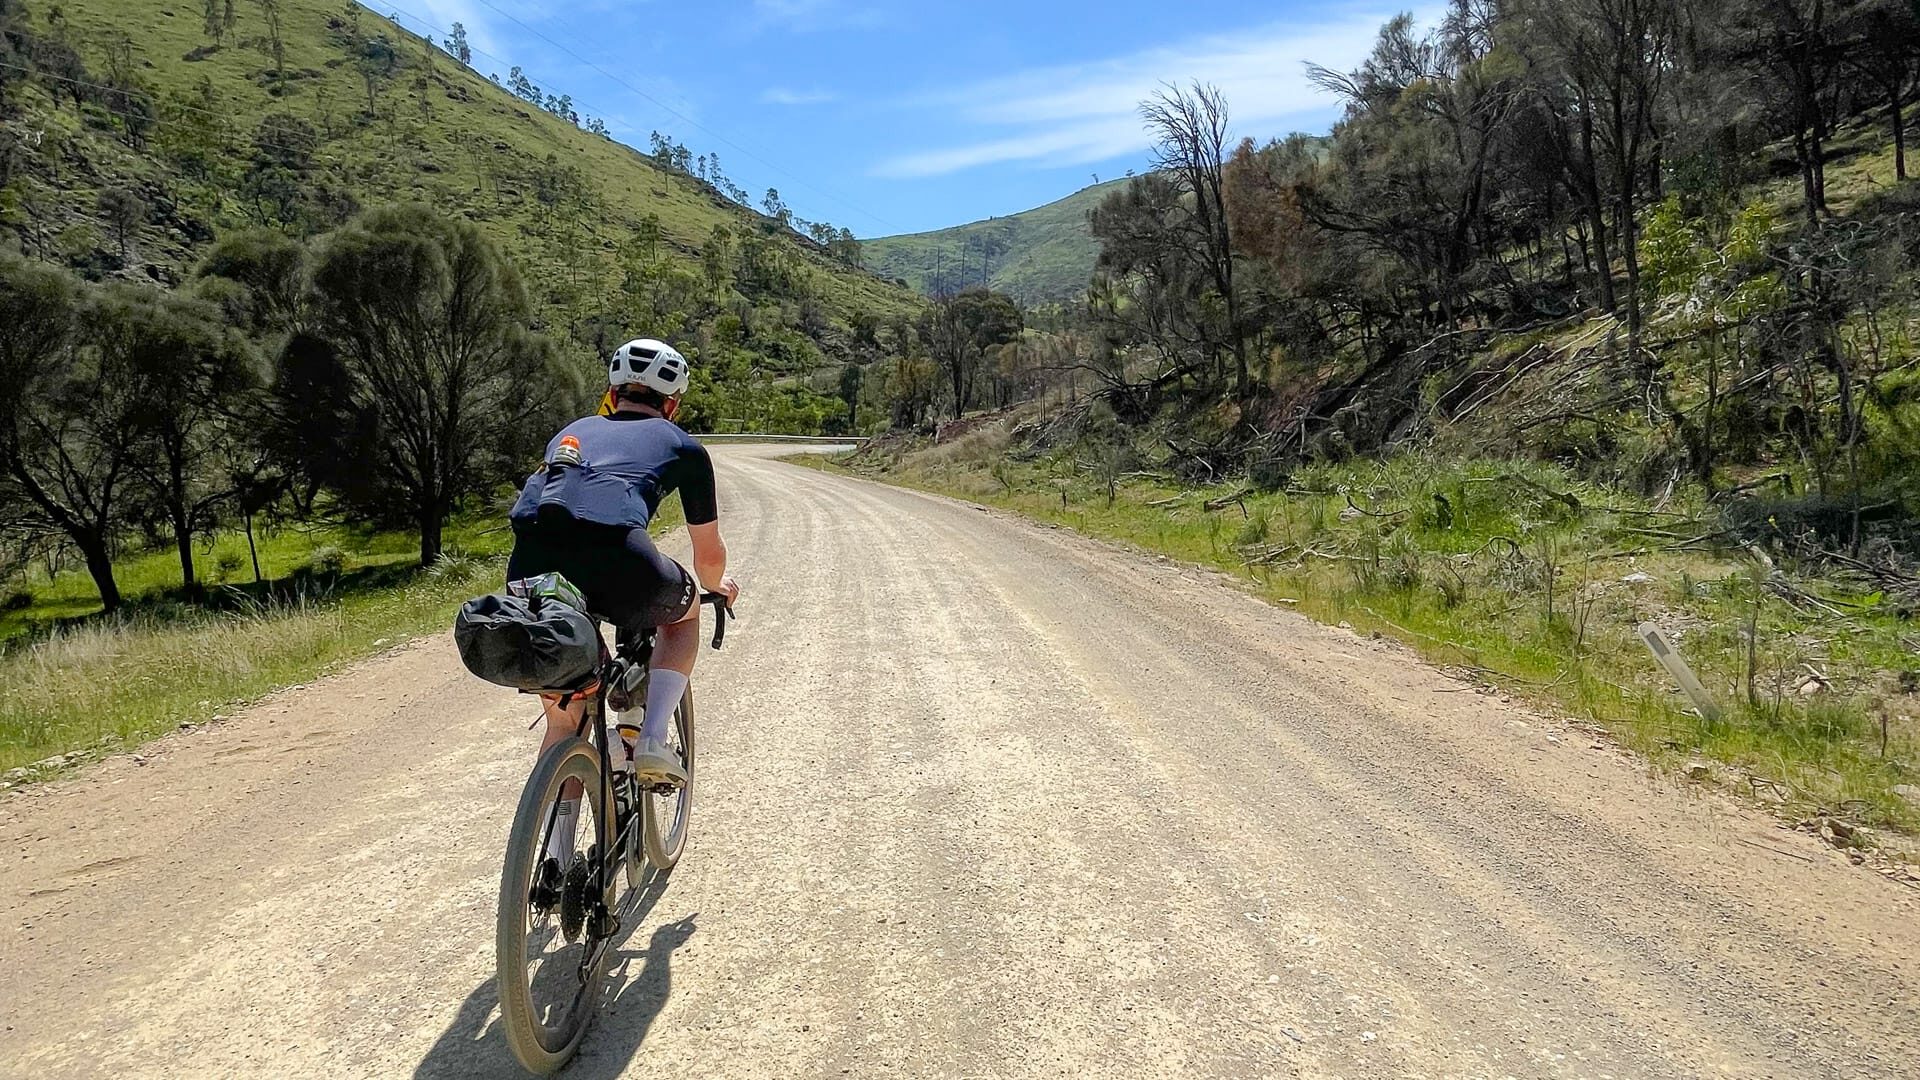
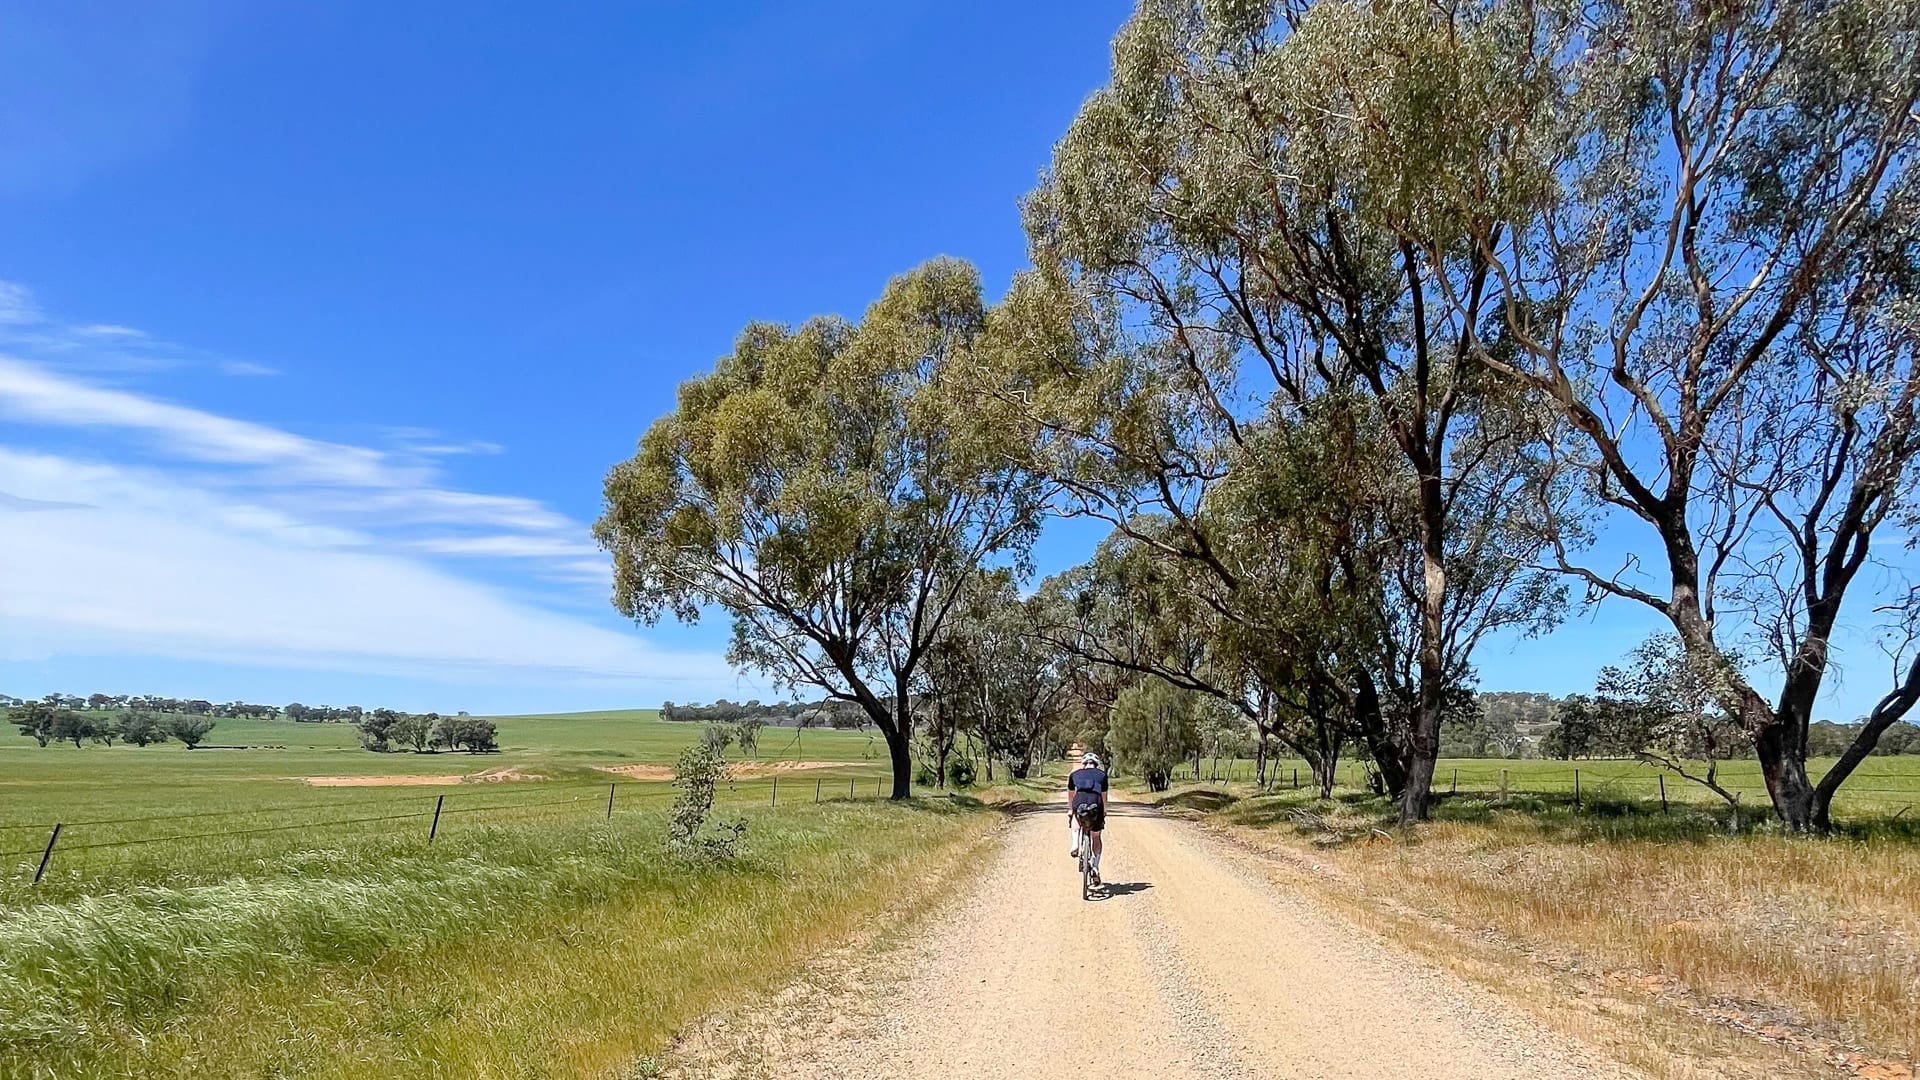
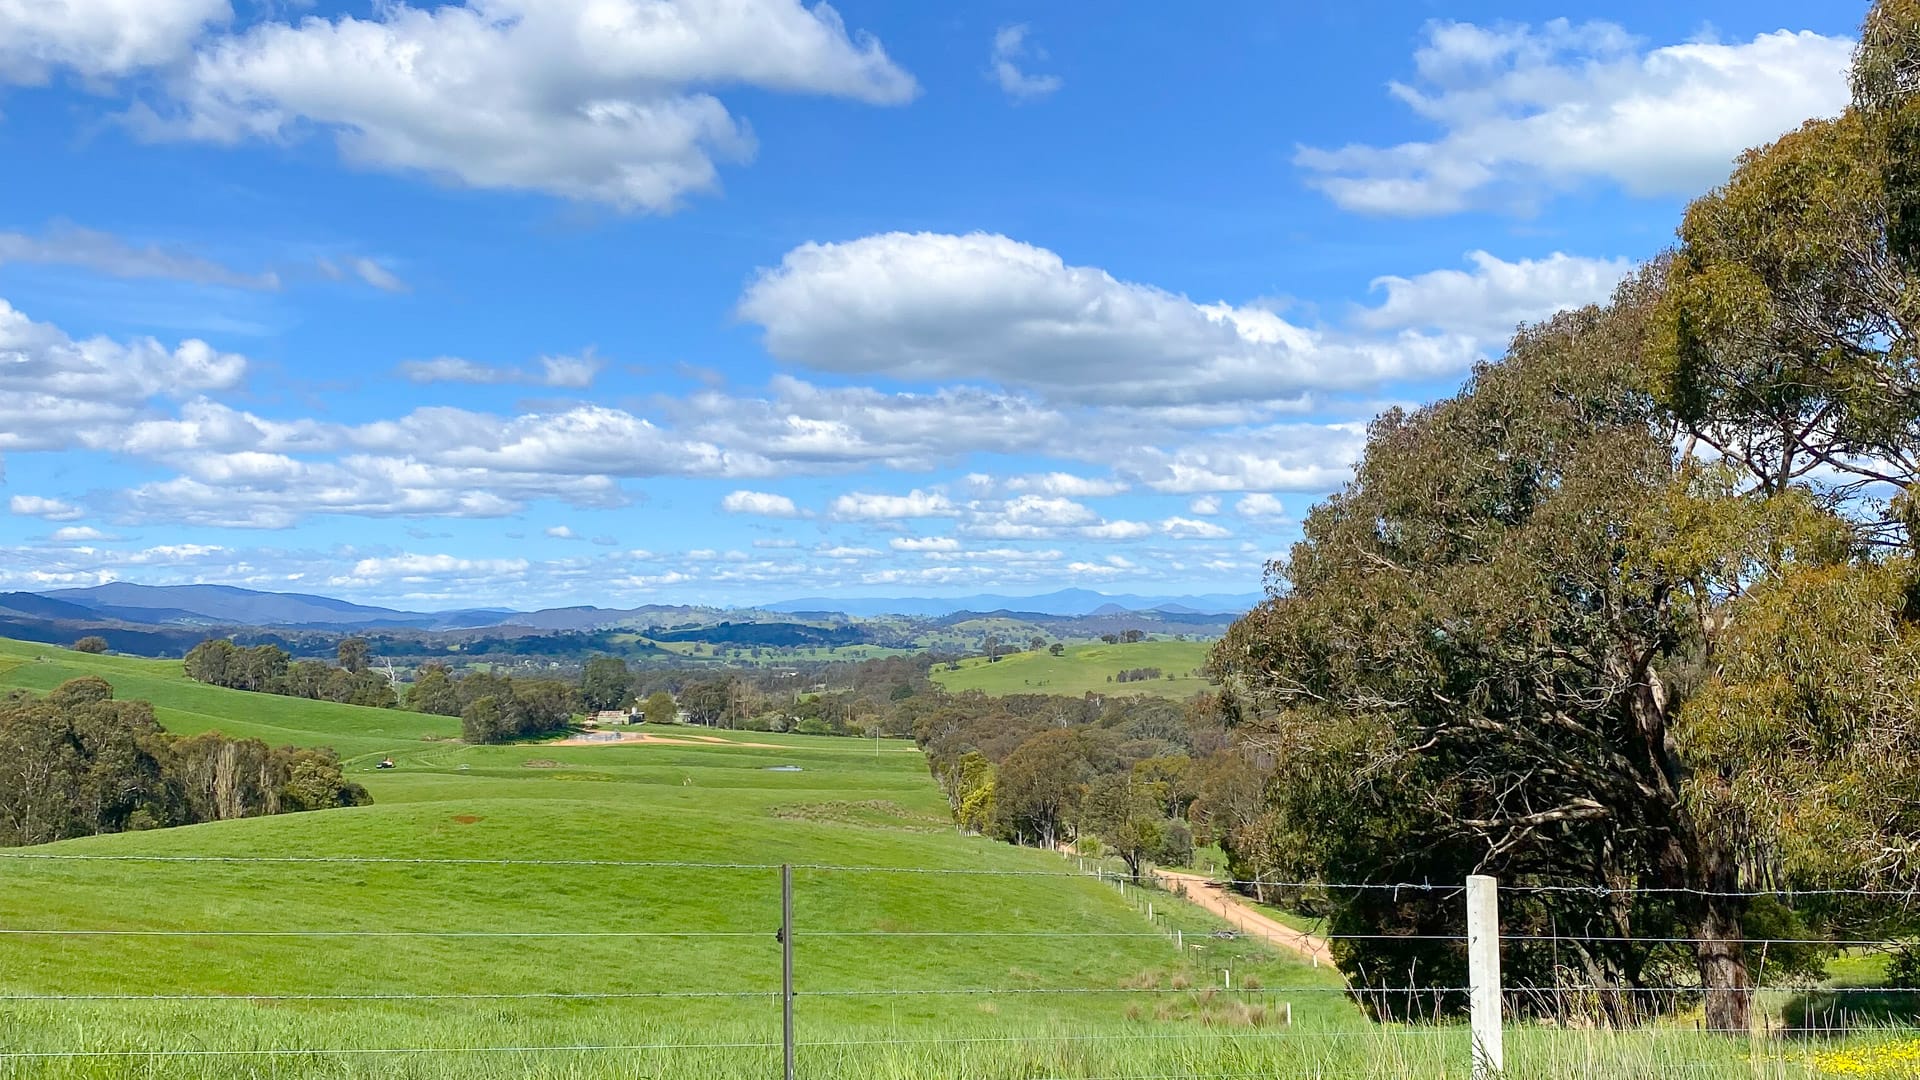
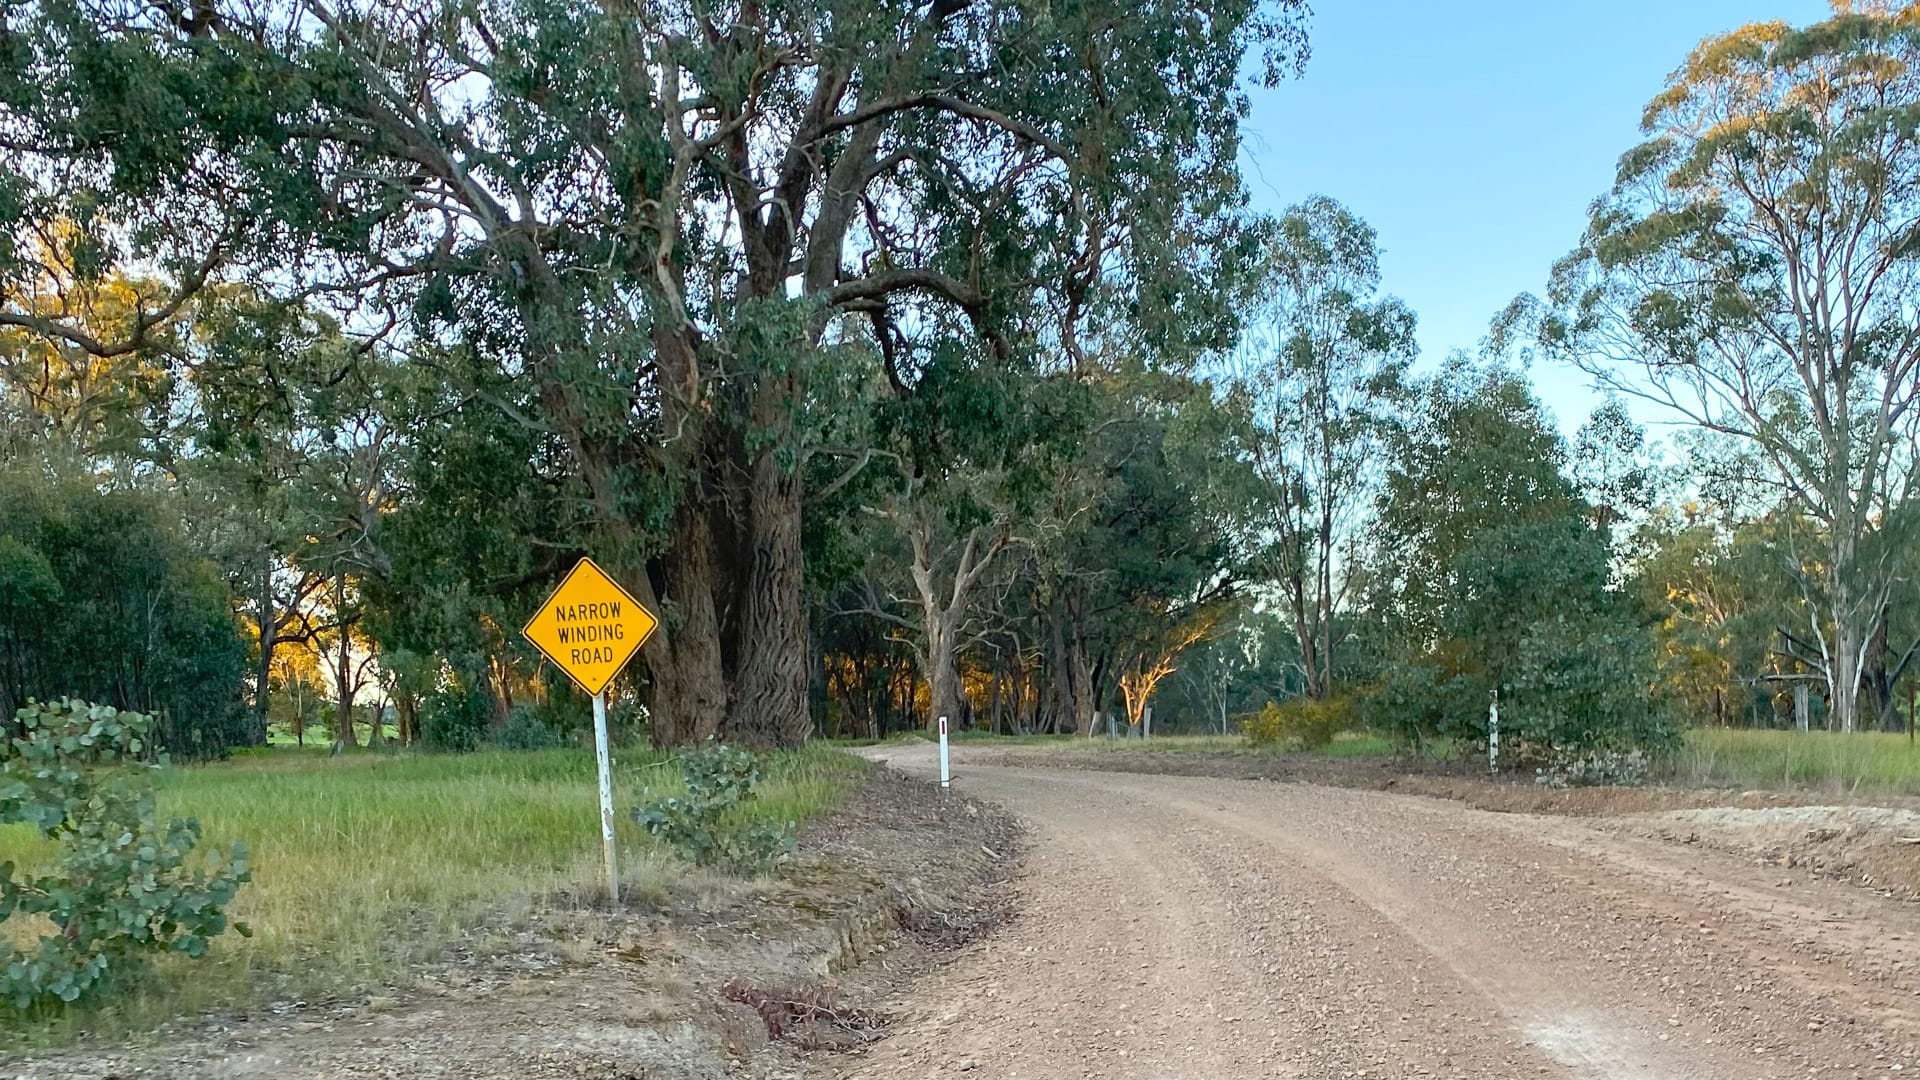
We wanted to experience a whole range of landscapes while cycling in Australia, so we made an effort to meander our way through the Victorian Alps, rather than skirt around the flatter roads to the north like some other bikepacking routes. We took in everything from wide gravel roads and beautifully maintained rail trails, to twisting alpine climbs and even a few pretty remote bush trails. There were also some wonderful villages and small towns.
We were careful to avoid bigger roads and stay off the highway as much as possible. We created the route ourselves and, for the most part, planned it day by day as we went.
Below is a map highlighting some of the key places we visited and mentioned in this article. Hover over the map pins to see the names of places.
What regions of Australia does this route explore?
The Melbourne to Sydney cycling route we created took us through the mountainous regions of Victoria, over to the coastal scenery of southeastern New South Wales.
This isn’t an official, signposted route; it’s simply the itinerary we mapped and rode ourselves. The bikepacking tour technically starts at Melbourne Southern Cross train station, which feels like a natural launch point from the city centre and suited the slightly convoluted logistics of our trip (explained more clearly later on). Starting from the station also makes the route practical for travellers: you can fly in with your bike and gear packed up, take the bus or train from the airport into the city, rebuild your bike near the station and roll straight out of Melbourne on the bike paths through the Yarra Bend Park towards the small country town of Lancefield.
However, as we were staying with a friend in Lancefield, we started our tour in Lancefield (see Day 1 below) and cycled back to Lancefield from Melbourne city centre at the end of our trip (see Day 10 below).
- Victorian Alps: Part of the Great Dividing Range and home to Victoria’s highest peak (Mount Bogong). The twisting alpine roads through luscious green valleys, and the small town of Bright, were real highlights.
- New South Wales: In contrast to the greenery of the Alps, once we crossed over into New South Wales, the terrain became synonymous with what you might expect from Australia. Sun-soaked planes and expansive red dirt vistas.
- Snowy Valleys/Snowy Mountains: Nestled in the foothills of the Australian Alps, there’s much rougher gravel here, and this section featured some of our hilliest rides.
- Wollongong: The ride out towards Wollongong opens up into wide rolling hills before you hit the awesome views and smooth tarmac of the coastal route as you roll into the city.
- Sydney: After eight days of remote, quiet riding, arriving in Sydney can feel a bit jarring as it’s obviously far more urban and built up. Be aware! The cycling infrastructure here was nowhere near as good as cycling in Melbourne. More on that below.
Take a look at this YouTube video we created for an insight into what you can expect:
 There's a Youtube video here!
I'm fine with Youtube cookies
(Video credit: Laura Senior & Ollie Smith / @LKSRacing)
What is the terrain like?
Our Melbourne to Sydney bikepacking route featured a pleasingly challenging variety of terrain. The asphalt sections were smooth and fast, and for the most part the gravel was some of the best I’ve ever ridden: smooth, well-maintained and virtually free of traffic!
Be aware! You will encounter some rougher gravel and sections of choppy single track, but there’s nothing hugely technical. The climbing is mainly rolling with steady gradients. However there were some tougher climbs towards the end of the trip that might pinch a little on tired legs.
How did you navigate the route?
We created the route ourselves, and planning was mainly day by day. We’d look at maps online to see where we could stay the following day, how far we wanted to ride, what the terrain was like and where resupply stops would be. More details on accommodation and fuelling below!
We created the routes on Strava and uploaded them to our bike computers. You can find the GPS files for each section of the ride on the day-by-day itinerary below.
How challenging is it to cycle from Melbourne to Sydney?
1,400 kilometres of cycling is clearly quite a solid challenge. But the great thing about bikepacking across Australia is that you can set your own schedule. This means you can factor in rest days and break up the longer stints of riding over a few extra days if you need to.
Terrain-wise, there’s nothing too technical on the route my partner and I planned. A lot of the gravel sections were really smooth, though do be aware you will encounter a few stretches of rougher, single track riding. That total of just under 14,000 metres of climbing might sound a bit intimidating too, but in reality, much of the climbing is steady and rolling rather than super steep gradients.
More details below on how long we took to tick off the kilometres, and my suggestions for how to make the trip more manageable if you’re slightly newer to multi-day long distance rides.
Part 2: Why is cycling from Melbourne to Sydney a must-do?
Awe-inspiring scenery
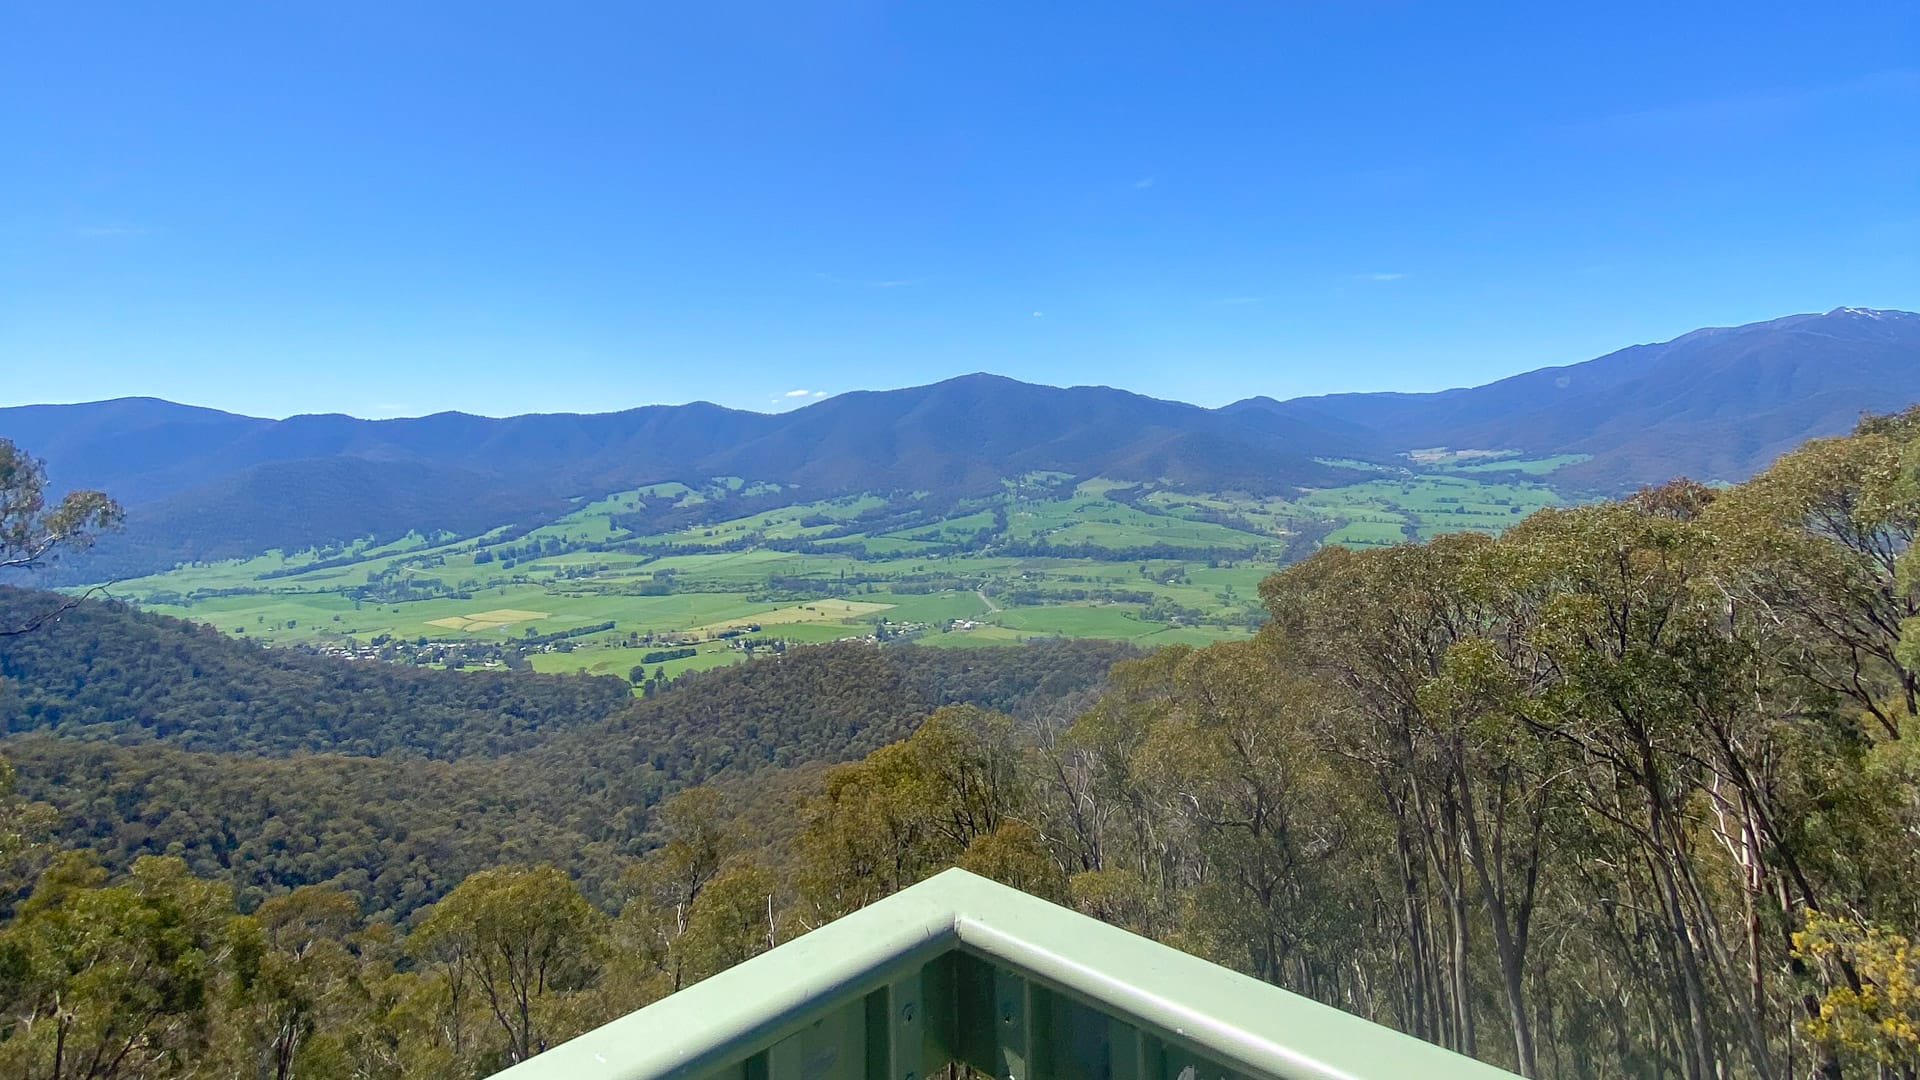
The route was absolutely incredible, with beautiful scenery providing the backdrop to pretty much every single kilometre we rode. By cycling from Melbourne to Sydney, we got to experience a huge variety of terrain. From quiet gravel lanes to lush green valleys, amazing coastal views and the classic sweeping red dirt vistas you’d expect from Australia. The Tawonga Gap viewpoint was one of my favourite moments of the entire trip, and that’s a memory that will last a lifetime!
Discover Australia’s hidden gems
Cycling across Australia meant we stopped off in small towns through Victoria and New South Wales. These are the kind of places we probably wouldn’t have considered if we were here for a more ‘traditional’ holiday. We discovered some true hidden gems, including Walla Walla, the small town of Bright and Gundagai (home to legendary milkshakes!).
Incredible gravel riding
There’s a fantastic network of gravel roads in Australia, and it’s some of the best gravel I’ve ever ridden. For context, I’ve done bikepacking trips all over the UK, covering the full length of Wales (both ways). I’ve also ridden across Europe, through most of Belgium and across Spain from Ibiza to Madrid.
Australia still stood out. Smooth, well-maintained and quiet. There were stretches where we could ride for miles without seeing anyone!
Challenging (but fun) climbs and descents
Don’t let the long distances or the relatively high daily elevation put you off. Each day was challenging but manageable. The climbs are mainly steady, and the views at the top always make it worth your while. The descents are great fun too!
My top highlights
- The descent into Kings Valley on our third day of riding is up there with my top five favourite descents of all time.
- The viewpoint at the top of the Tawonga Gap, where you can see the snow-capped peak of Mt. Bogong and the sweeping Kiewa Valley below, was a true ‘wow’ moment.
- I think my top highlight has to be the Victorian Alps, particularly visiting the small town of Bright, tucked under Mount Beauty.
The breathtaking view across to Mt. Bogong at the Tawonga Gap viewpoint (photo credit: Ollie Smith)
Part 3: My Australia biking itinerary, Melbourne to Sydney
Before we set off, we actually spent some time in Lancefield for a very good reason. We’d been up there helping our mate Mitch Docker set up and run ‘The Dirty Docker’, a three-day gravel cycling festival based in Lancefield.
Logistics-wise, I flew into Melbourne first and stayed in the city for a few days. Mitch then drove down in his van and picked me up with all my gear, and we headed back up to Lancefield. A few days later, we drove back down to Melbourne again for the launch party, then picked up Laura (she flew in three days after me). From there, we all drove back to Lancefield, stayed for about a week, and then started the Melbourne to Sydney ride from there! But for anyone planning on riding from Melbourne to Lancefield, see below.
Day 1: Lancefield to Avenel
GPX DownloadTerms of use reminder
Key statistics
104 kilometres
876 metres of elevation gain
Summary
Day one was 90% on gravel, and it was so much fun!
This was our first experience of cycling in Australia, and we quite quickly understood why the gravel riding here is some of the best in the world! The rolling gravel roads of Victoria are incredible: smooth, fast and quiet. We rode for hours without seeing another soul.
Highlights
The final climb rewards you with an incredibly picturesque descent into Avenel, surrounded by bluebells as the sun sets. Keep your eyes peeled for wildlife too; we saw plenty of kangaroos!
Good to know
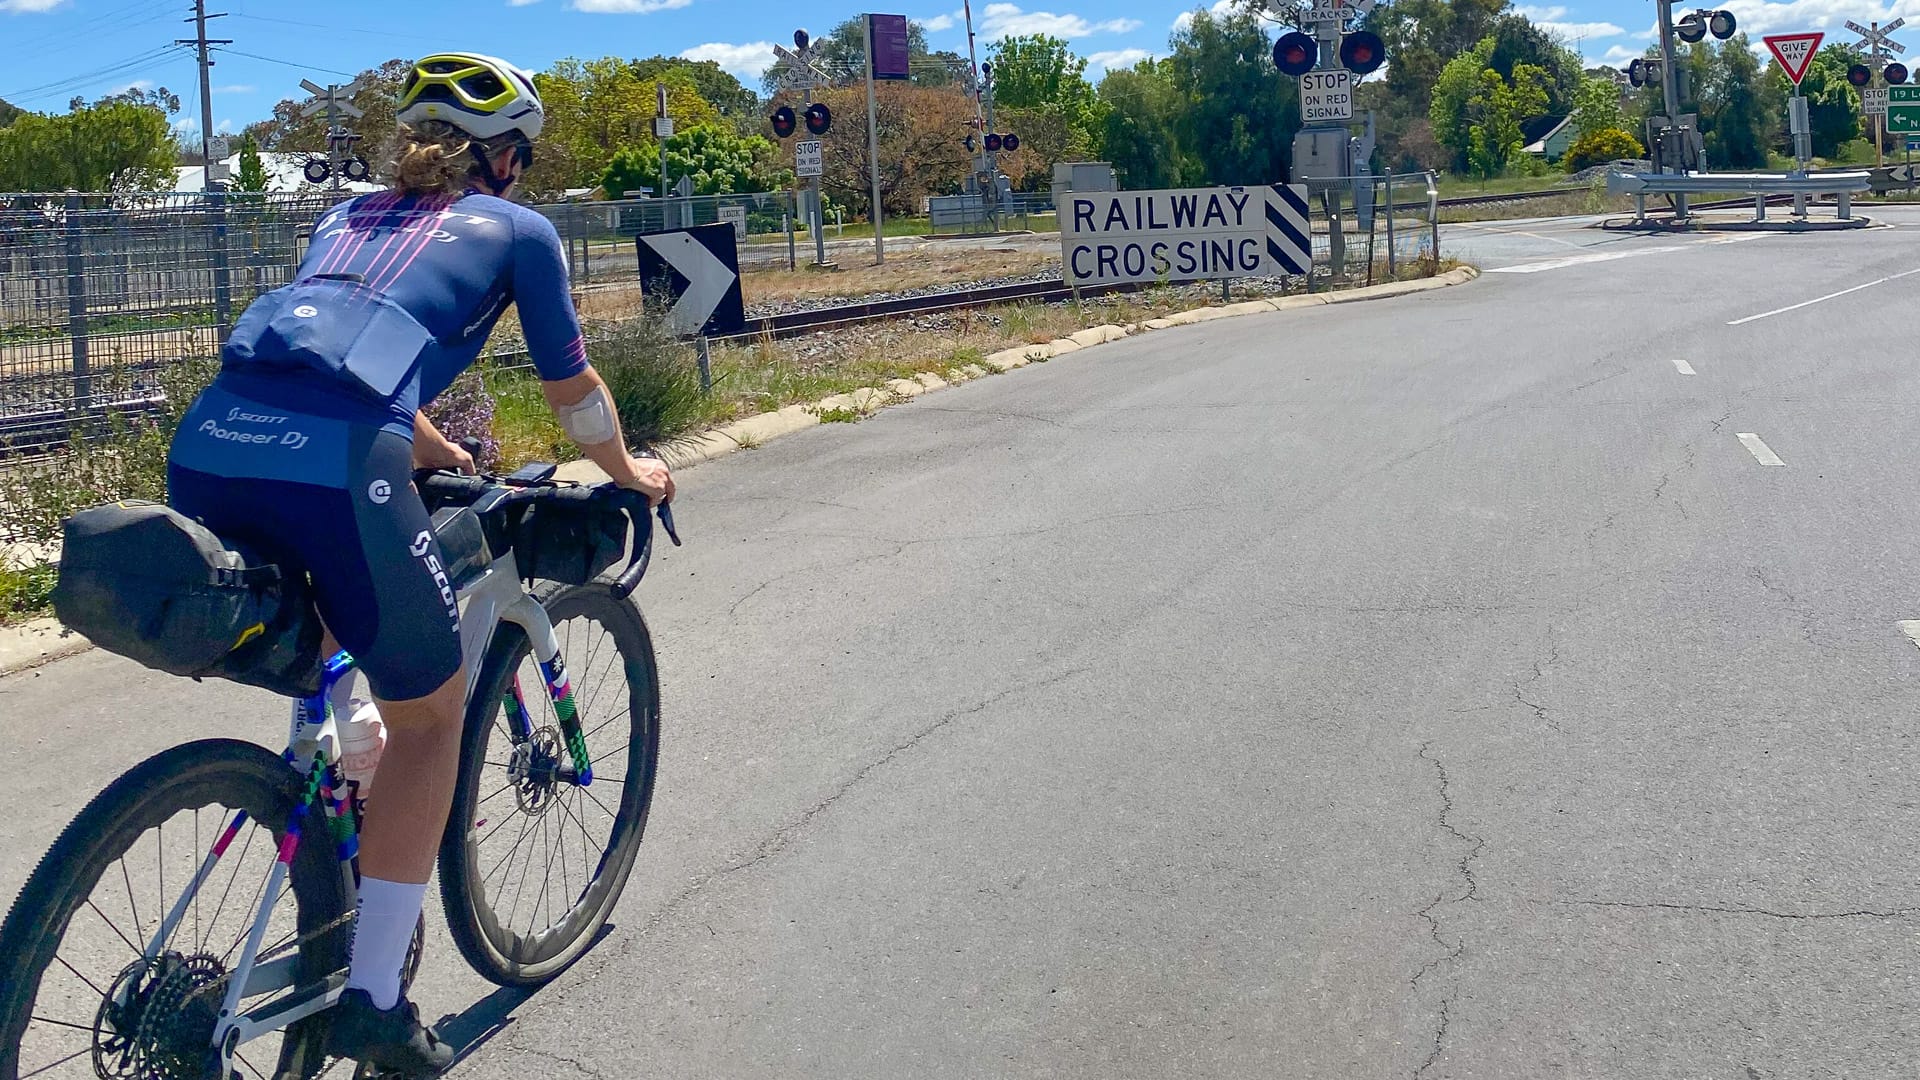
- The route crosses over the Hume Freeway a couple of times. It’s a busy two lane road with fast moving traffic and big trucks, so be aware and exercise caution!
- Avenel is a small town, so if you arrive late you may find many places are shut. The closest place to get food was the roadhouse next to the freeway.
- If you’re likely to arrive late, it’s worth stopping in Seymour (~30 kilometres before Avenel) to eat or stock up on food for when you arrive.
Where to stay in Avenel?
We spent the night in an amazing converted railway carriage we found on Airbnb. It was quirky, super cosy and very peaceful.
Leaving Avenel over the railway line, which we would walk back across shortly after (photo credit: Ollie Smith)
Day 2: Avenel to Mansfield
GPX DownloadTerms of use reminder
Key statistics
113 kilometres
1,175 metres of elevation gain
Summary
We were planning our trip day to day (more on why below). After chatting with some locals, we decided to steer our route towards the ski town of Mansfield as they suggested this would offer far more scenic riding than the more ‘desolate’ scenery to the north east. The first part of the route from Avenel to Mansfield was gravel. After an hour or so of riding, it switched to asphalt.
Once we crossed the Hume Freeway, we climbed up to a plateau and rolled on some chunkier gravel for a few hours before descending down to Merton. From there, it was the glorious Great Victorian Rail Trail all the way through Bonnie Doon to Mansfield.
Highlights
The Great Victorian Rail Trail is an incredible bit of infrastructure with some amazing valley views. The gravel was smooth and we rode over a cool disused rail bridge at the lake.
Good to know
- The smooth gravel at the start of the ride turned into some choppy single track, which was slow going. We decided to cross over the train track, which was very quiet, to get onto some asphalt but obviously be cautious if you decide to do this! You’ll have the smooth gravel of the Rail Trail to look forward to later on in the ride.
- After climbing Oak Valley Road (around the 25-kilometre mark) we were on a rural plateau for quite a few hours. Make sure you have plenty of food and water with you when you set off as you won’t have a chance to refill until you arrive in Merton (75 kilometres into the ride).
Where to stay in Mansfield?
Alzburg Resort was home for the night. It’s a hotel with a pool, sauna, and hot tub. Mansfield is a ski town and we were there in the spring, so it was very quiet and we basically had the place to ourselves.
The view down to Merton from the plateau on day 2 (photo credit: Ollie Smith)
Day 3: Mansfield to Bright
GPX DownloadTerms of use reminder
Key statistics
163 kilometres
1,697 metres of elevation gain
Summary
This route started on asphalt out of Mansfield and took us on a winding climb to Whitfield. The gradient was steady, but there were some false summits and plateaus. Be prepared to be climbing for well over an hour, after which you’re rewarded with the glorious descent down into the King Valley. The asphalt soon gave way to gravel on the beautiful Rose River Road, popping out at Lake Buffalo.
The small town of Myrtleford is a good spot to resupply before another wonderful bike path/rail trail up the valley to the finish in Bright.
Highlights
This was one of my favourite days of the entire trip! Here’s why:
- Climb to Whitfield/descent into the King Valley: The climb was great fun. Other than being quite long, the gradients are steady so it’s not too challenging. Once we burst out of the trees at the top, the descent into the King Valley was amazing. For me, this is up there with the top five descents of all time!
- King Valley Vineyards: You’re surrounded by some of the best vineyards in the country. If you’ve got the time and the inclination to stop, a vineyard tour or wine tasting here would be a good way to spend an afternoon.
- Bike path into Bright: Really well-maintained, blossom-lined in the spring, and kept us off the busier main road.
Good to know
Once you leave Whitfield after the descent into the King Valley, there isn’t another resupply opportunity until Myrtleford (around 65 kilometres away). Make sure you have enough food and water.
Where to stay in Bright?
Bright Velo was a wonderful, bike-friendly place to stay. This is a cycling-specific hotel with a workshop, laundry facilities and a great bar and restaurant. The town of Bright is fantastic, it was my favourite place from the whole trip. I’d suggest getting pizza from Hometown and coffee from Sixpence while you’re there!
Day 4: Bright to Albury
GPX DownloadTerms of use reminder
Key statistics
123 kilometres
1,231 metres of elevation gain
Summary
We started by rolling out of Bright on asphalt, but the route heads uphill pretty much straight away. The Tawonga Gap climb was steady, without any really steep pinch points. But be prepared to be climbing for an hour or so.
Make sure you stop at the top of the Tawonga Gap, as there’s a viewpoint with the most beautiful vista of the snow-capped Mt. Bogong and the Kiewa Valley below. After another world-class alpine descent, you head north up the Kiewa valley for a few hours. This was cartoonishly pretty, with vibrant grass, clear blue sky, and virtually no traffic.
At the end of the valley, the route crossed over Lake Hume and onto another old rail trail all the way towards the city of Wodonga. We skirted around the city on a few kilometres of urban bike paths across the Murray River into New South Wales before finishing in Albury.
Highlights
- Tawonga Gap viewpoint: This is probably my number one moment from the whole trip; the view is incredible.
- Kiewa Valley: It’s beautiful, and even with a slight headwind we were still rolling along comfortably at 30kph! With a tailwind, you’d be flying.
Good to know
- Refill your water bottles at the post office in Tawonga, as there isn’t another resupply point until you’re out of the valley (approximately 50 kilometres of riding).
- Be aware! Some of the bike paths around the outskirts of Wodonga take you onto busier roads. It was rush hour when we rode through so it was quite busy. You soon get back onto segregated bike lanes for the final stretch into Albury.
Where to stay in Albury?
We stayed in a cheap motel for the night, as we wanted to save a bit of budget and stay somewhere nicer the following night. There’s plenty of them around and they’re all perfectly serviceable!
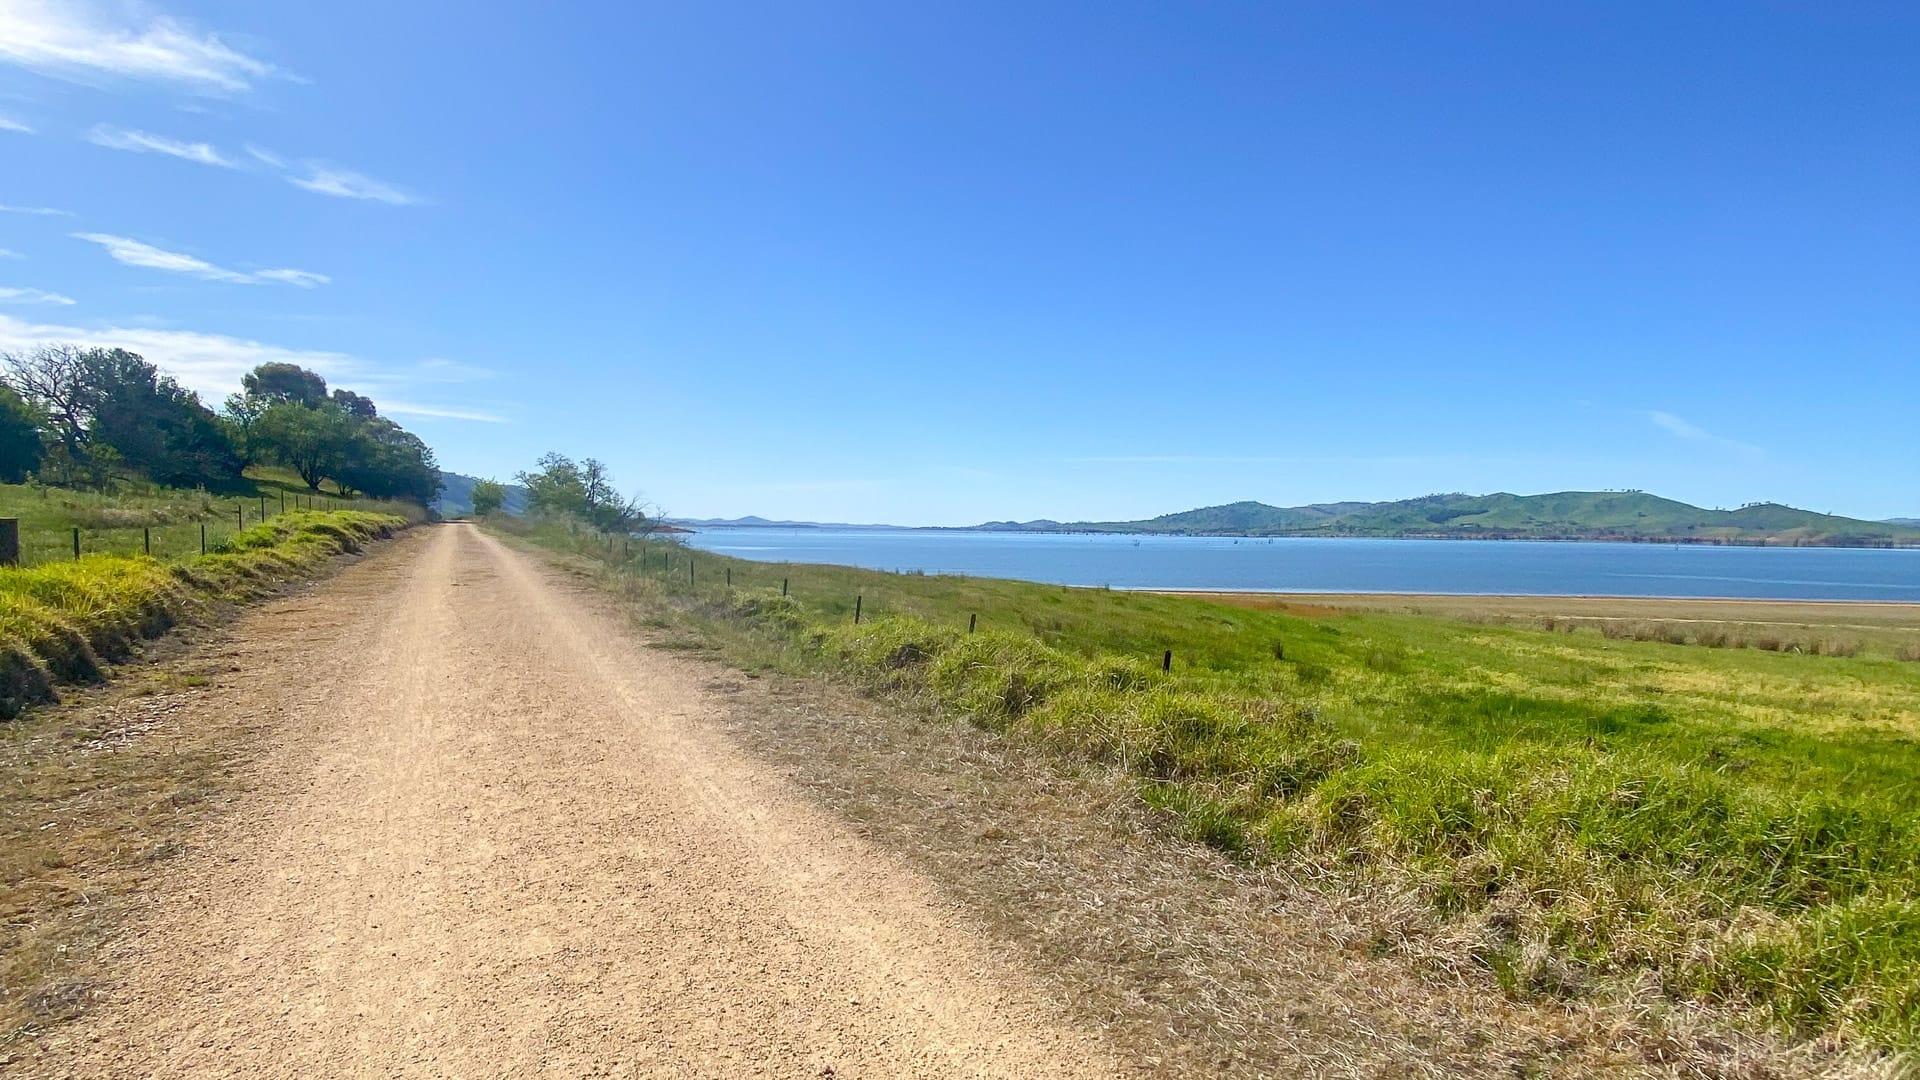
Lake Hume glistening under the baking sun after a long day in the Kiewa Valley (photo credit: Ollie Smith)
Day 5: Albury to Wagga Wagga
GPX DownloadTerms of use reminder
Key statistics
157 kilometres
1,065 metres of elevation gain
Summary
Day 5 started with quite a busy stretch of road to get out of Albury. We did consider re-routing to an alternative gravel climb to avoid these busy roads, but it would have been like riding up a red mountain bike trail (steep and very technical) so we stuck to the asphalt. It wasn’t too long before we were back on quieter rural lanes and gravel tracks. It was fast at first, but gave way to rougher singletrack.
Highlights
- Smooth gravel: There’s a good few hours of wonderfully smooth gravel riding on this route which feels great after a few days predominantly on asphalt.
- Feels like more of an adventure: The rougher singletrack sections are slow going, but they make the day feel a bit more adventurous. Other routes stick to the Hume Freeway, but we preferred the off road alternative.
- Walla Walla is a hidden gem: This small town is certainly worth stopping in, the carrot cake at the cafe there was great!
Good to know
Watch out for snakes. The rougher gravel sections dart in and out of tall grass. Make some noise so you don’t startle any sleeping brown snakes. They tend to be more likely to act defensively when surprised, and their venom is potent (source) so you’d rather not risk a bite! We ended up taking a short detour at one point as we heard some suspicious swishing in the long grass.
Where to stay in Wagga Wagga
We stayed at a small boutique hotel called The Houston, a short walk from the high street and some great food options. Considering the deciding factor in us staying in Wagga Wagga was the name, the town felt like a bit of a hidden gem.
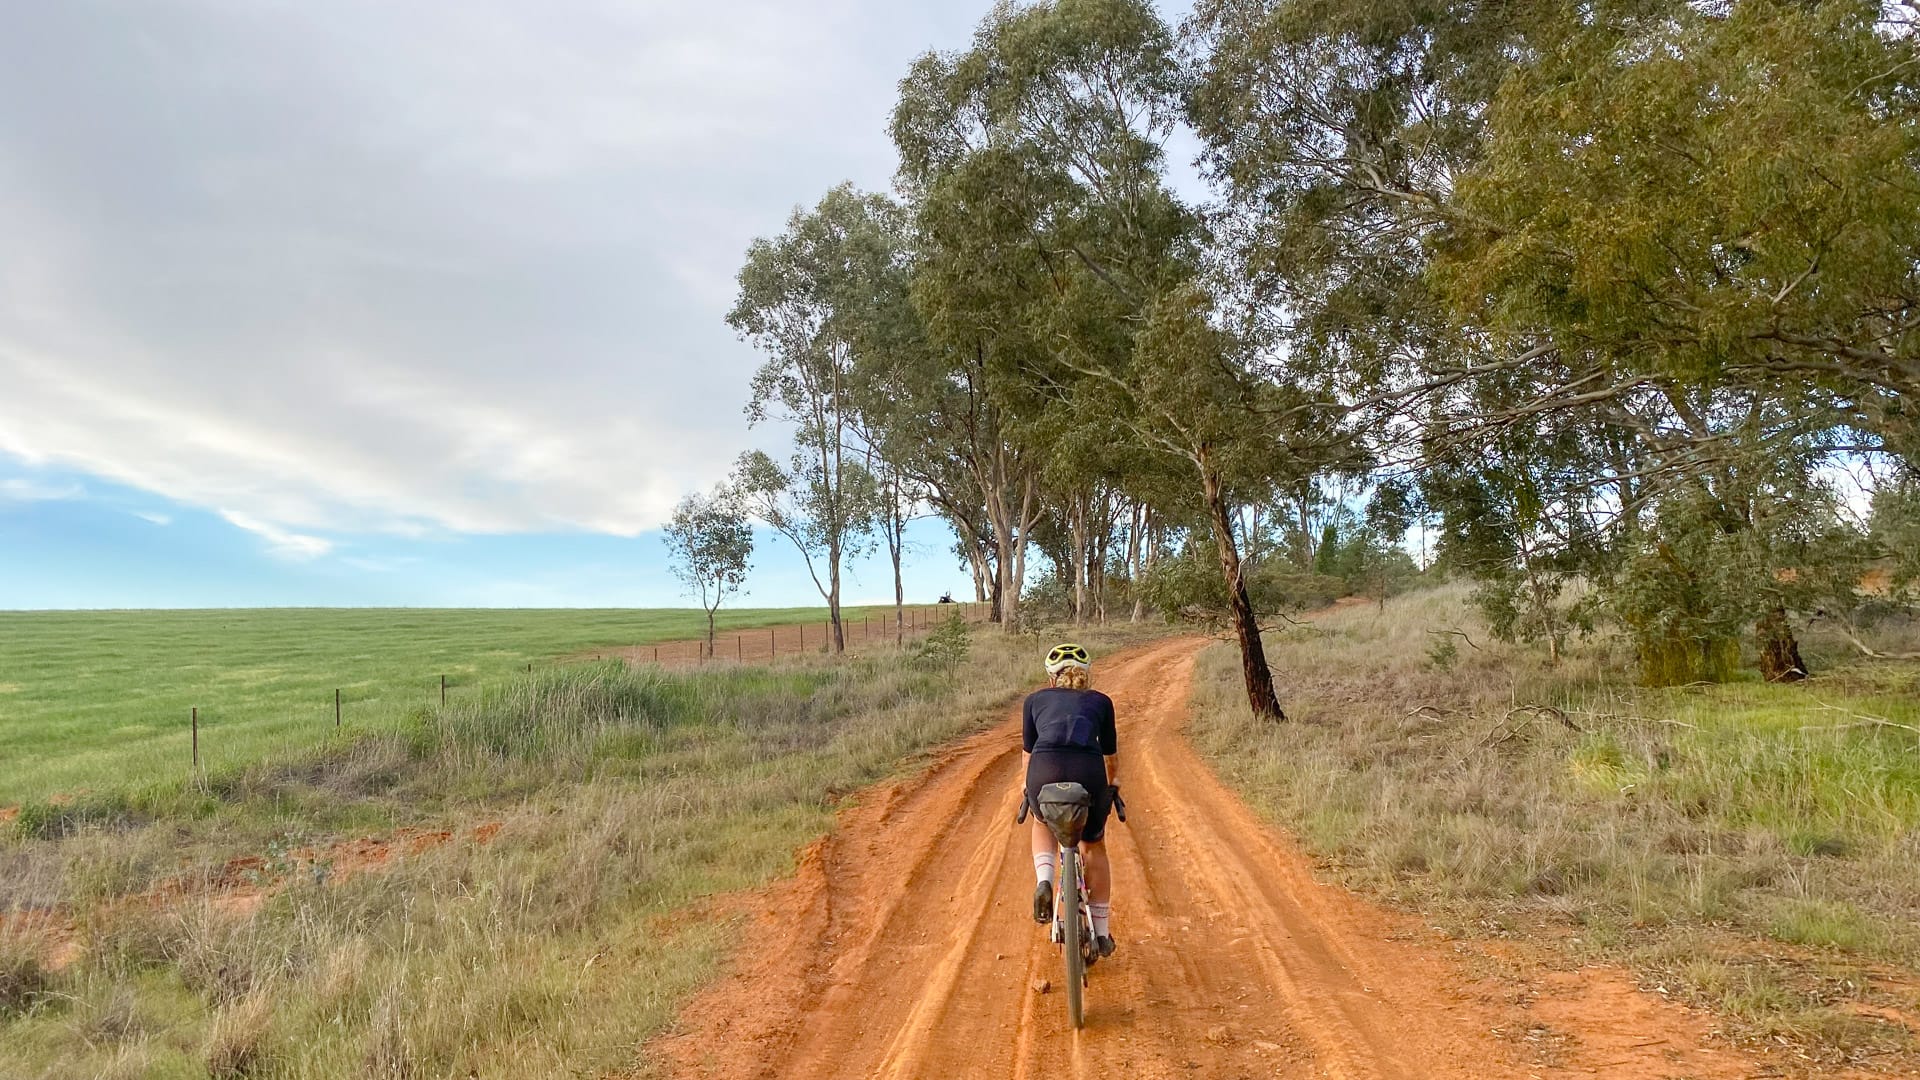
As we left the Alps behind and skirted the outback to Wagga Wagga, we saw more of the classic Australian red dirt (photo credit: Ollie Smith)
Day 6: Wagga Wagga to Tumut
GPX DownloadTerms of use reminder
Key statistics
122 kilometres
1,167 metres of elevation gain
Summary
A shorter day, all on asphalt, to give our legs a break; a good decision given there were two consecutive challenging days coming up afterwards. The route was continuously rolling, on a slightly bigger road, that was still pretty quiet, before turning off onto some nice country lanes. There were some beautiful valley roads to finish into Tumut. Keep your eyes peeled for mobs of kangaroos!
Highlights
- Wagga Beach: This is a famous inland beach on the river, voted one of the top ten beaches in Australia.
- Potential for fast conditions: It probably helped that we had a cross tailwind all day, but the roads on this route were all quite fast so you can cover the distance fairly quickly.
- Niagara Cafe: We stopped for a refuel in the small town of Gundagai. The Niagara Cafe here is a bit of an institution, I’d definitely suggest stopping in for one of their milk shakes!
- Mudjarn Nature Reserve: Riding through the valley here is seriously beautiful.
Good to know
- Be prepared for faster moving traffic. You’ll be riding on a slightly busier road compared to previous days, and while it was quite quiet the cars that passed us did so at quite a fast speed. Be aware! This can make you jump if you’re not expecting it.
- Watch out for magpies. Australian magpies have earned themselves a bit of a reputation for swooping at cyclists. ‘Swooping season’ is in the spring (a territorial response during their breeding season (source)) and they can be quite aggressive. I got swooped several times throughout the day; one even took a chunk out of my ear on our way out of Wagga Wagga!
Where to stay Tumut
Tumut isn’t very big, but there are a few accommodation options. We settled on a little Airbnb with a big garden just off the main high street. We decided to make the most of the earlier finish and clean the bikes. We had a few drinks at the Oriental Hotel then headed over the road for a pizza at ‘The Local Pizzaria’ which was great!
Day 7: Tumut to Gunning
GPX DownloadTerms of use reminder
Key statistics
163 kilometres
2,683 metres of elevation gain
Summary
Consider this the ‘Queen’s Stage’ of your own Tour Down Under! The 163 kilometre stretch from Tumut to Gunning had the most climbing of any of the days on our Australian bikepacking trip. It’s a deceptively tough day, but you do get the bulk of the climbing out of the way early on.
The first 50 kilometres was a rolling uphill stretch on smooth gravel through the Snowy Valleys/Snowy Mountains. After the descent into Wee Jasper, we were back on the asphalt for rolling climbs until we switched back to gravel on the way into the small town of Gunning.
Highlights
- Wee Jasper Gin Distillery: The general store in Wee Jasper was closed, so we stopped at the Gin Distillery instead. What a treat! I could have stayed there all day. They serve tasty snacks including grazing boards and toasties. The spirits are all made on site using rainwater and local botanicals. Pretty cool, and worth a visit!
- More amazing valley views: The scenery is like something out of a movie!
Good to know
- Stay in Yass if you want a shorter ride. This is obviously a long day on the bike and it’s also hilly. If that’s a bit of a stretch, you could shorten it by staying at Yass, which you’ll reach after about 120 kilometres.
- Limited resupply options between Tumut and Yass. Be aware that the only resupply point between Tumut and Yass is Wee Jasper. The general store is closed on a Sunday, but as mentioned the Gin Distillery is also a great place to stop off for a bite to eat.
Where to stay in Gunning?
Be aware! Gunning is very small so accommodation options might be limited. We stayed in virtually the only Airbnb available, a quirky old butcher’s shop. The hosts came out to greet us and were incredibly welcoming, even inviting us to have a drink and sit by the fire in their garden with them later that evening. Another great little hidden gem!
Day 8: Gunning to Wollongong
GPX DownloadTerms of use reminder
Key statistics
234 kilometres
2,340 metres of elevation gain
Summary
A big day on the saddle! The good news is, this section of our Melbourne to Sydney bicycle tour was almost all on asphalt, with only a few small gravel lanes, so we ticked off the kilometres fairly quickly. This route took us all the way to the coast, with a rewarding descent down McQuarie Pass followed by an urban roll up the bay to Wollongong. Watch out for a slightly tricky section around 100 kilometres in where you have to cross the Hume Highway.
Highlights
McQuarie Pass is a great descent; make sure you enjoy it after 200km of rolling climbs!
Good to know
- Option to shorten the ride: This is a physically challenging day. If your schedule allows, you could split this up. I’d suggest Bundanoon as a good place to stop (around 134 kilometres of riding). There were some nice cafés and restaurants here.
- Busier roads: As you get closer to the coast, the roads get busier. Be aware! The final hour or so of riding after Talwarra is very busy and quite hectic.
- Hume Highway crossing: There’s a short section on the route at the 103-kilometre mark where you have to ride on the Hume Highway and then cross all the lanes to take an exit. It’s the only time you have to go on the highway all day, but it might feel a bit intimidating, so be careful. Unfortunately, there’s no real alternative, but be aware that you’ll have to cross the traffic as there isn’t a bridge or a tunnel.
Where to stay in Wollongong?
Wollongong is a fairly big city, so there are plenty of hotels to choose from. We didn’t find anything particularly special!

Otford lookout with stunning coastal views back towards Wollongong (photo credit: Ollie Smith)
Day 9: Wollongong to Sydney
GPX DownloadTerms of use reminder
Key statistics
111 kilometres
1,265 metres of elevation gain
Summary
If you’re finishing your bikepacking trip in Sydney, this will be your final day of riding. We took the coastal route on the bike paths out of Wollongong. After around 25 kilometres, the coast road starts. There wasn’t too much traffic when we rode it, and the cars that passed us were considerate. But it is a bigger road, so keep your wits about you.
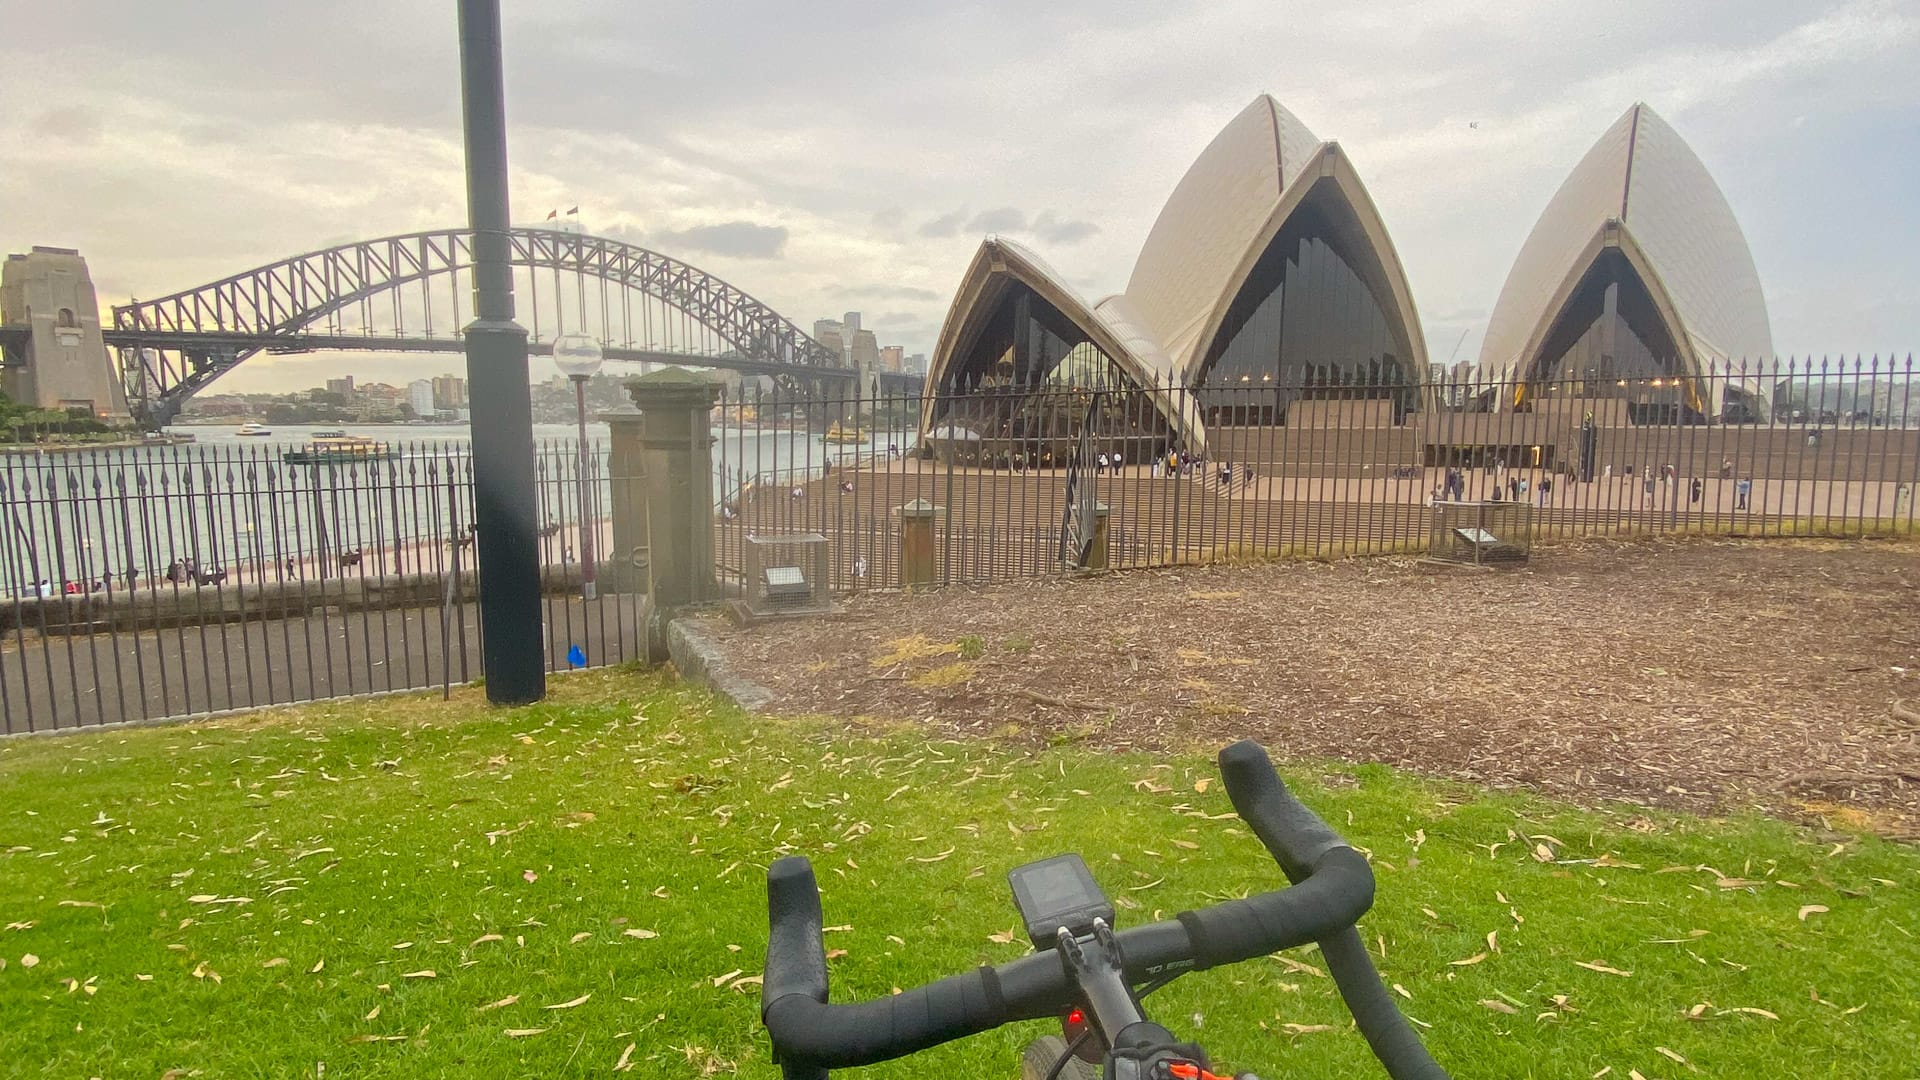
Be aware! This is also where the route starts to get much hillier. We found the climbs tough, particularly as our legs were quite tired by this point. Once past Bald Hill we entered the Royal National Park and made our way to the ferry at Bundeena. This takes you across to Cronulla, then it’s a mix of urban bike paths, road, and some pavement to get to the Opera House in the very centre of Sydney. Job done!
Highlights
- Royal National Park: The park is beautiful. It was closed until 3pm when we arrived. We had the choice of a two-hour wait or a diversion onto the Princes Freeway. We chose to wait, and it was certainly worth it.
- Bundeena Ferry: This 20-minute crossing saves you approximately 90 minutes of riding on busy main roads, so I’d suggest making use of it. It cost $30 AUD for two people and two bikes.
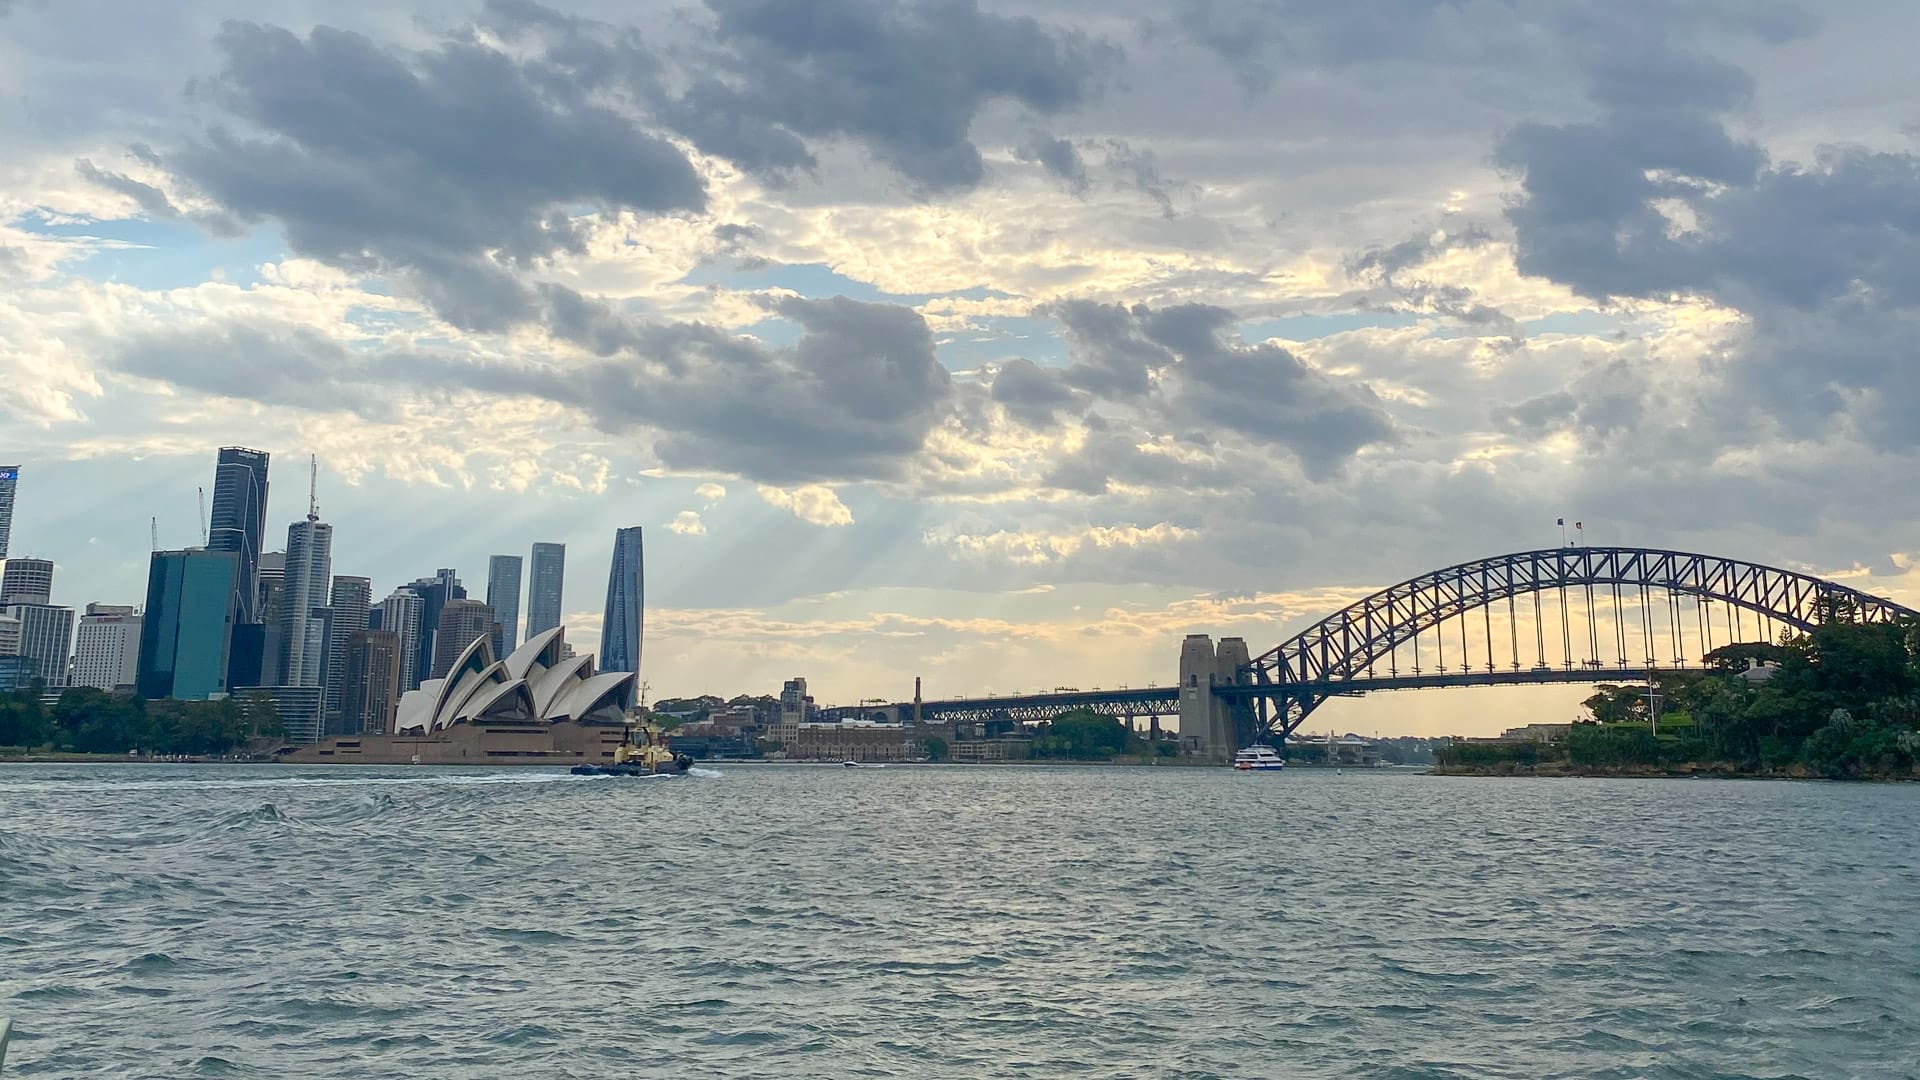
- Sydney Opera House: An obvious highlight! Reaching the iconic Sydney Opera House was a remarkable way to finish our Melbourne to Sydney bikepacking trip.
Good to know
- Cycling in Sydney can be tricky. Be aware that Sydney isn’t particularly well set up for cyclists. Bike paths can be a bit sporadic, especially as you get closer to the city centre. More details below.
- No cycling in the Botanic Gardens. Note that when you arrive in Sydney, our route will take you to the Opera House via the Botanic Gardens. You’re not allowed to cycle here, so be prepared to walk with your bike, or you may face a fine.
Where to stay in Sydney?
As a major city, there are plenty of accommodation options in Sydney to choose from, so it really depends on what you want to do while you’re there. We stayed in Bondi Junction, which worked well. You’re close to the iconic beachfront, and there’s a train station close by, so you can drop your bikes and head into the city centre to see the sights.
Getting off the ferry in Cronulla for the last push into the city (photo credit: Ollie Smith)
Day 10 (Epilogue): Melbourne to Lancefield
GPX DownloadTerms of use reminder
Key statistics
146 kilometres
2,063 metres of elevation gain
Summary
If you’re starting your bikepacking trip across Australia in Melbourne, this will actually be the first day of your trip. But for us, this was our final ride before heading back to the UK. We started the trip in Lancefield, and we’d left our luggage with a friend there. So we had the ride from the city up into the countryside to round out the trip and finally connect Melbourne and Sydney.
The route above took us out of the city through Yarra Park on bike paths. We then headed up to Lancefield on a variety of quiet lanes and gravel climbs, with a few sections of singletrack. The route above was designed by a local friend, Mitch Docker. It’s pretty tough going, so we ended up trimming it down a little by staying on some main roads. You can see our exact route here.
Highlights
- Melbourne cycling infrastructure: Cycling in Melbourne is great. There are plenty of segregated bike paths that take you all the way out of the busy city centre through Yarra Park.
- Mount Disappointment: Thankfully, Mount Disappointment didn’t live up to its name! It was a tough climb, but very rewarding, with waterfalls including Strath Creek Falls and scenic forest trails.
Good to know
A tough start (or finish) to your ride. The route in the map above is scenic, but it’s not the most efficient way to get to Lancefield. As mentioned, we trimmed it down a little to save our tired legs! Be prepared for wind and tough climbs. It might be a bit of a shock to the system if this is your first day of the trip!
Part 4: What do you need to know before cycling from Melbourne to Sydney?
When is the best time of year for bikepacking Australia?
Our trip was in mid-October, which is the height of springtime in Australia. The weather was ideal for cycling! We didn’t get a spot of rain, and temperatures ranged between mid 20℃ to low 30℃. The temperatures were a little cooler in Victoria, and as we cycled north, it got steadily warmer. But we were never sweltering in the heat or feeling cold.
Top tip! A local friend, Mitch, also informed us that spring is when the gravel roads in this region of Australia are in the best condition. They’re dry and free of mud, but they also haven’t yet been pounded by trucks all summer, so the gravel is smooth rather than rough and corrugated.
How did you plan the best route to cycle from Melbourne to Sydney?
Our Melbourne to Sydney bikepacking trip was self-supported, and we decided to plan our route and stop-off points day by day rather than following a set itinerary. If you’d prefer a more leisurely Australian cycling holiday, I’d suggest giving yourself at least two weeks to complete this route. Here are the main things I’d suggest you consider when planning your route:
What type of terrain and scenery do you want to cover?
We could have planned a flatter route from Melbourne to Sydney by sticking to the roads that go slightly further north. However, we wanted to make sure we saw a wide range of landscapes on our trip, so we made a conscious decision to ride up into the Australian Alps. We also took our gravel bikes, which meant we could head off the beaten track and avoid the busier roads.
How self-sufficient do you want to be?
Originally, we wanted to head further south on our trip, crossing Mt. Kosciuszko (Australia’s highest peak (source)) and dropping into Canberra.
However, accommodation and resupply options would have been limited, and we’d have faced multiple riding days over 200 kilometres. If we’d had more time and hydrapacks/bike bags to carry more food and water, I’d have liked to explore this area more!
What accommodation and resupply options will be available?
When planning your route, research towns along the way and check where you’ll be able to stock up on food and water or find a bed for the night.
Be aware! We travelled in the spring and a lot of the seasonal ski resorts were closed.
What tools can you use to plan your route each day?
We planned most days in Strava. We used Strava heatmaps loosely, but for large parts of the ride, there were only one or two realistic route options anyway. We wanted to stay off main roads, which immediately narrowed down the options. In practice, it was usually a case of choosing where we wanted to finish for the night, dropping a pin, and letting Strava’s auto-route snap onto the available gravel tracks and quieter back roads.
How long does it take to cycle from Melbourne to Sydney?
We completed this trip in 10 days total, which was fine. But I have to admit I was pretty tired by the end! I think a rest day in the middle or spreading the last few big days of riding out over a few extra days might have made it a little more manageable.
If you’d prefer a more leisurely Australian cycling holiday, I’d suggest giving yourself at least two weeks to complete this route. If you have more time, you could also route down to Omeo and explore the Australian Alps further. I’d suggest giving yourself an extra three to five days if you want to add this on, so you can enjoy it without totally breaking yourself!
How much money should cyclists budget for an Australian bikepacking trip?
We didn’t have a predetermined budget for the trip, but we were keen to make sure we didn’t get carried away. The flights from the UK to Melbourne were expensive enough!
Overall, I found Australia was a little cheaper than I expected, and the quality of things was much higher. We didn’t have a single bad meal or a bad coffee the entire time we were there. I don’t mind paying for that!
We spent approximately £100 per day, including food and accommodation. The 10-hour overnight train from Sydney to Melbourne cost us £50 per person, which I thought was amazing value.
What is the best type of bike for bikepacking in Australia?
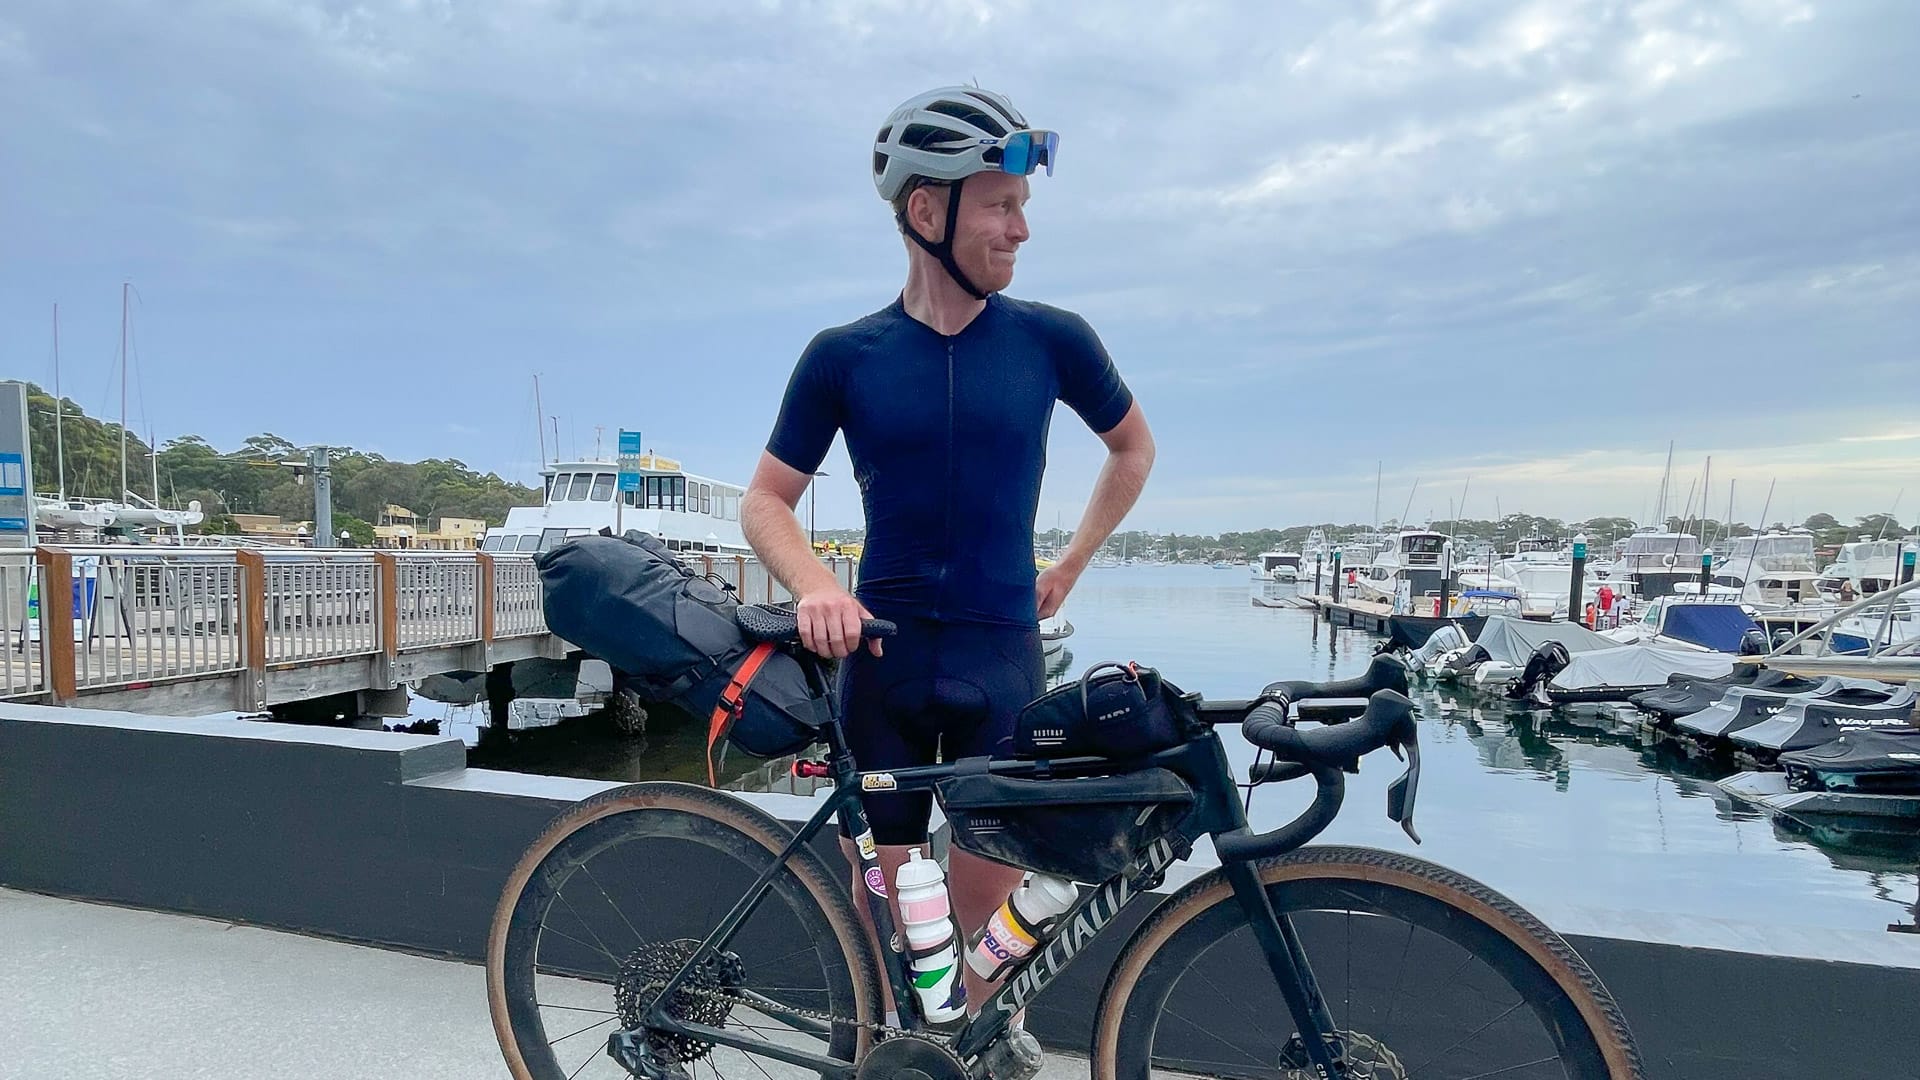
The gravel in Australia is some of the best I’ve ever ridden, so I’d definitely suggest taking a gravel bike. We didn’t look into renting, mainly because we were in Lancefield beforehand for The Dirty Docker, which included a CX race and a 130-kilometre gravel race. We wanted to ride the bikes we already knew and trusted. We’re also both very experienced at flying and travelling with our bikes, so bringing our own was always the simplest option for us.
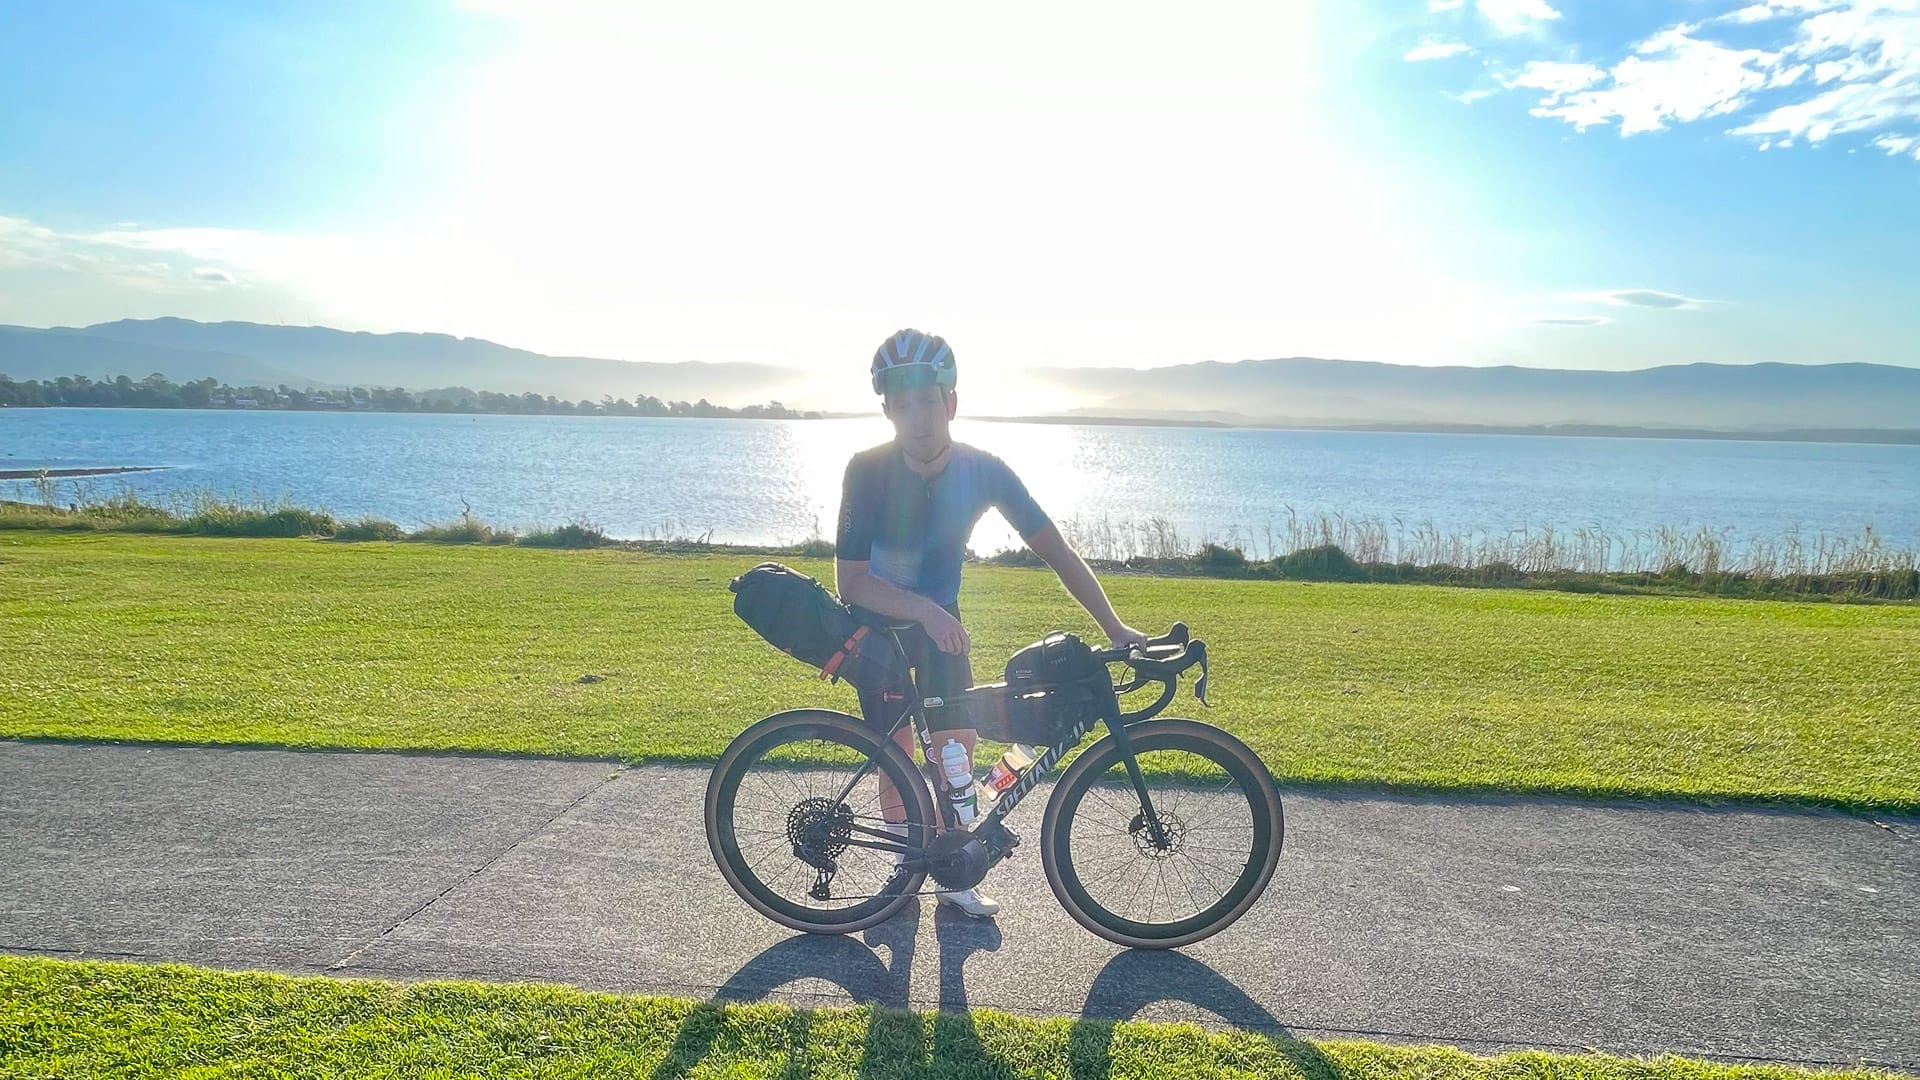
For our bikepacking setup, we fitted our gravel bikes with 45mm semi-slick tyres. This made them fast enough to cover ground on the asphalt, whilst also being versatile enough to make the most of the fantastic network of gravel roads that criss-cross across most of the country.
The entire trip meanders on and off pure champagne gravel roads (photo credit: Ollie Smith)
Is it easy to find cycling-friendly hotels and accommodation in Australia?
Planning a trip like this in advance and pre-booking accommodation means you’re always chasing a schedule and riding with a deadline. We didn’t want the stress of time constraints, so we planned our route and found accommodation day by day.
Each night, we did a bit of research to decide where we would stop and check the options for hotels or Airbnbs. In some of the smaller towns, options were limited, but we were always able to find somewhere to stay. We also didn’t have a single issue bringing our bikes into our rooms. We typically didn’t ask in advance, but no one ever seemed bothered. If anything, the bikes were a great conversation starter, and most people were more curious about where we were heading or impressed by what we were doing.
You’ll find where we stayed each night in the daily itinerary above! Bright Velo hotel in Bright was a particular highlight, so I’d suggest staying here. It was super bike-friendly, and the workshop and laundry facilities are really useful for bikepackers.
How to get there and away?
We flew in and out of Melbourne from the UK with Malaysia Air. We took the bus into Melbourne city centre, where we spent a few days before starting our bikepacking trip from Lancefield.
To get back to Melbourne from Sydney, we took the overnight train, which costs $100 AUD per person, plus $12 AUD per bike. I’d suggest getting a cabin on the train if they’re available, as the seats get pretty uncomfortable!
We cycled from Melbourne back up to Lancefield (our friend there stored our luggage and bike boxes). We got an Uber back to Melbourne airport from Lancefield with our luggage and bike boxes. This took around 45 minutes and cost $100 AUD.
How did you transport your bike?
We took our own bikes and travelled with them in solid bike boxes on the flight from the UK to Melbourne. In terms of storing bike boxes in Melbourne, we didn’t formally look into airport storage. I think Melbourne’s main station (Southern Cross) has a left luggage facility, although I’m not sure whether they’d accept full-sized bike boxes. There are also luggage-storage apps that can connect you with shops or hosts who’ll hold bulky items, but in our case we were lucky enough to have a mate just out of town who could store our boxes for us.
Taking bikes on public transport wasn’t an issue at all in my experience. We had to put the bikes into cardboard boxes for the overnight train from Sydney to Melbourne. These were provided by the station, and they take the bikes to look after before boarding. This means you can arrive earlier in the day, pack the bikes away, and head out to explore the city before getting back to the station to travel.
Top tip! You do need to book the bikes in advance. They have to be added to the train booking separately. In our case, we had a few issues because you have to call up after booking the tickets, and our UK phone number caused some complications. We ended up popping into the station and speaking to the help desk instead, and the staff couldn’t have been more helpful.
Any highway code and travel information I should be aware of?
As ever, it’s a good idea to check current travel information before you book and travel. For UK visitors, the UK government travel information pages for Australia are here.
You should also read and follow Australia’s highway code.
Do I need travel vaccinations and insurance?
Make sure you have all the recommended travel vaccinations.
Ensure you have comprehensive travel insurance that covers all the activities you plan on undertaking.
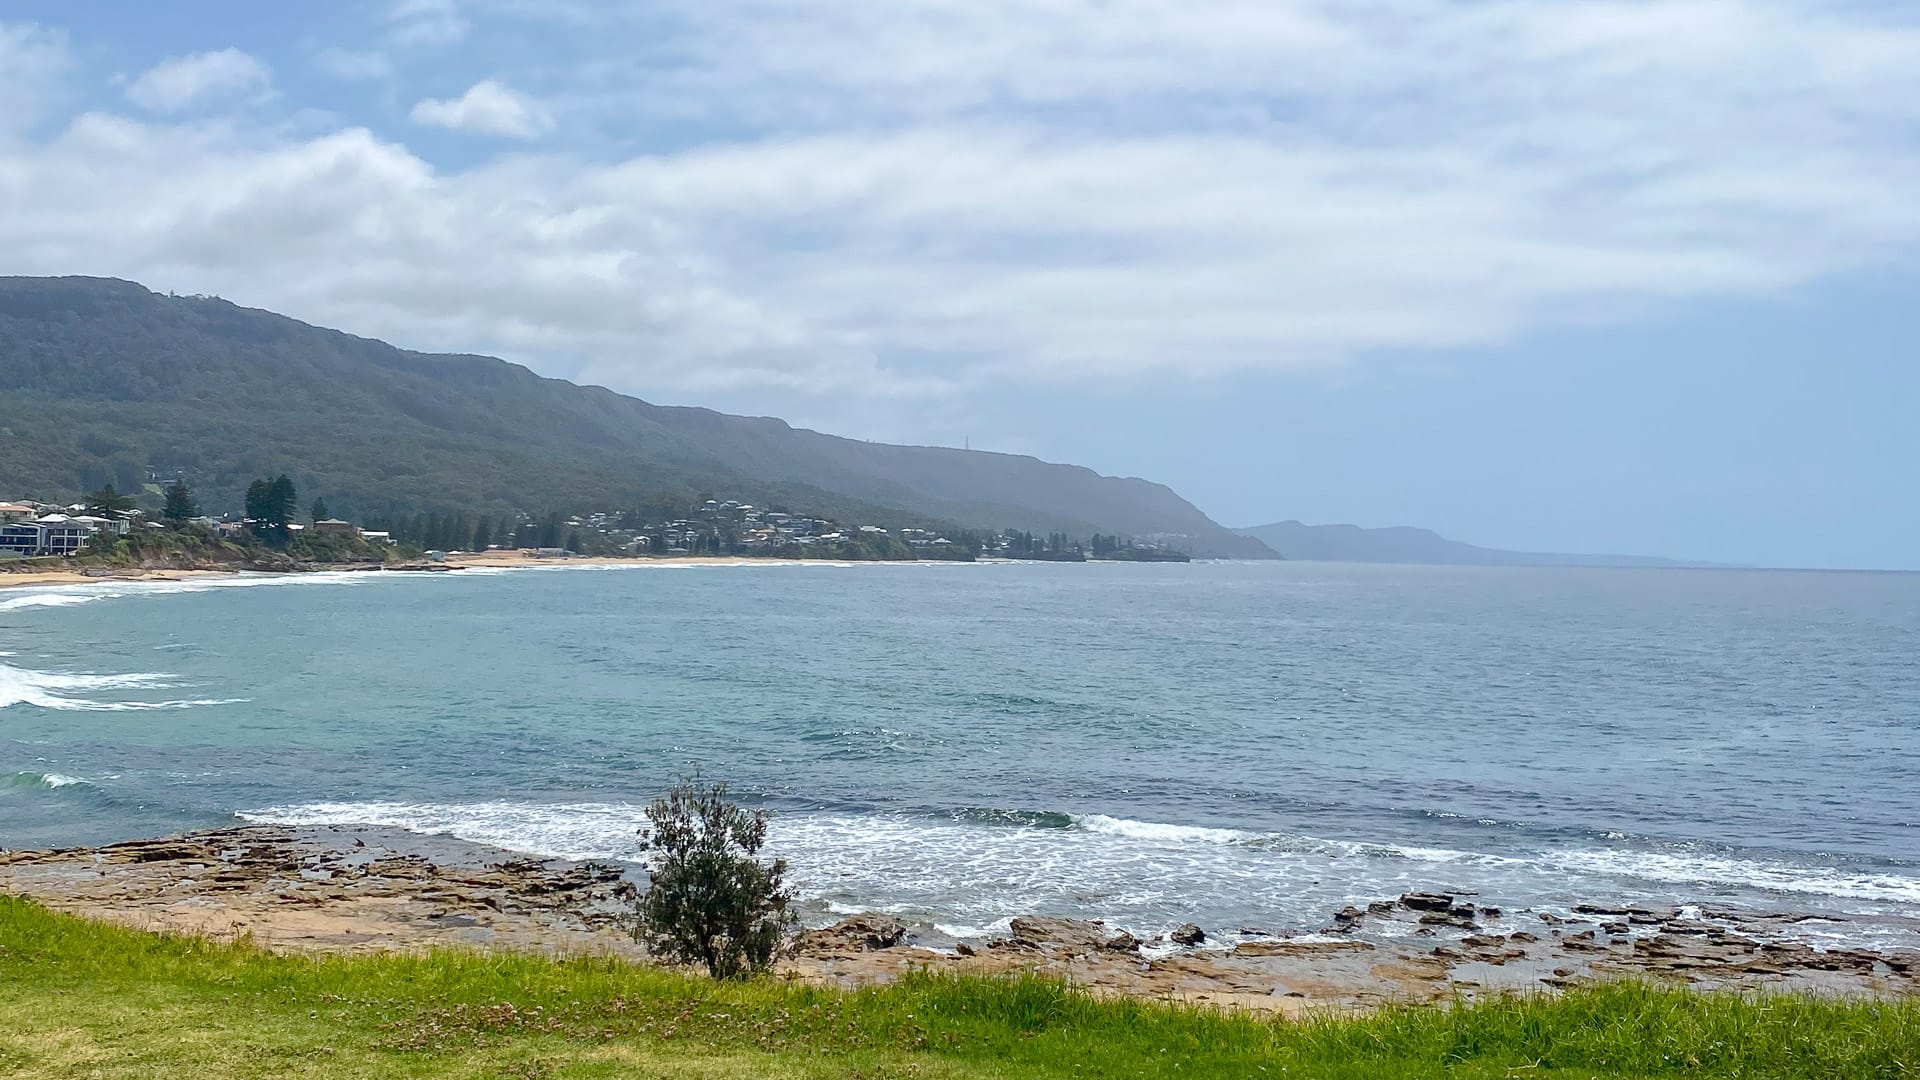
The punchy coastline looming ahead on the road from Wollongong to Sydney (photo credit: Ollie Smith)
Part 5: Do you have any other tips for cycling from Melbourne to Sydney?
How fit do you need to be to ride this route?
Laura and I did this trip at the end of a long racing season, so we both had a good level of fitness. We’re also experienced at multi-day rides, so several hours of steady riding each day to complete the route in ten days was comfortable for us. On most days, we were riding anywhere from around four to eight hours, plus extra time for stops to eat, refuel, faff, and actually enjoy the journey. Some days we just wanted to get it done, so we’d swap turns on the front and push the pace, while on others we’d meander along side by side, which naturally meant travelling a bit slower.
If you’re less experienced with bikepacking, you’re not sure of your fitness, or you’d just prefer a more leisurely pace. I’d suggest giving yourself at least two weeks to complete this route. This would allow you to plan a rest day or break up the two big days towards the end into four shorter days.
There wasn’t really any section of this route that was particularly difficult. Most of the climbs were gradual, the terrain was rolling, and there was nothing too technical in the off-road sections. As a result, I feel this route should be accessible for most cyclists with a good level of base endurance, particularly if you give yourself some wiggle room to spread out some of the longer days.
What should I pack for bikepacking in Australia?
We were carrying all of our bikepacking gear with us, so it was important to make sure we had all the essentials we needed without cramming too much into our frame bags. Here’s what we took (we weren’t camping!):
Cycling kit and other clothing
- Two sets of cycling kit
- One set of off-bike clothes
- Toms shoes (these are super light and packable!)
- A ‘foul weather’ bag with leg and arm warmers, a jacket, overshoes and a cap (thankfully we didn’t need these!)
- Packable down jackets
- Toiletries
Tools and bags
- Essential bike spares plus mech hangers, sealant and plugs, brake pads and spare bolts
- Restrap fast straps (to repair any wobbly or broken bikepacking equipment and secure the frame bags to the bikes)
- Packable backpacks (useful to fill with food before getting to the accommodation each night)
- 1.5L water capacity on the bikes, plus an additional bottle for our back pockets for longer stretches
- First aid kit
Check out our in-depth packing guide for bikepacking and cycling holidays for more helpful suggestions.
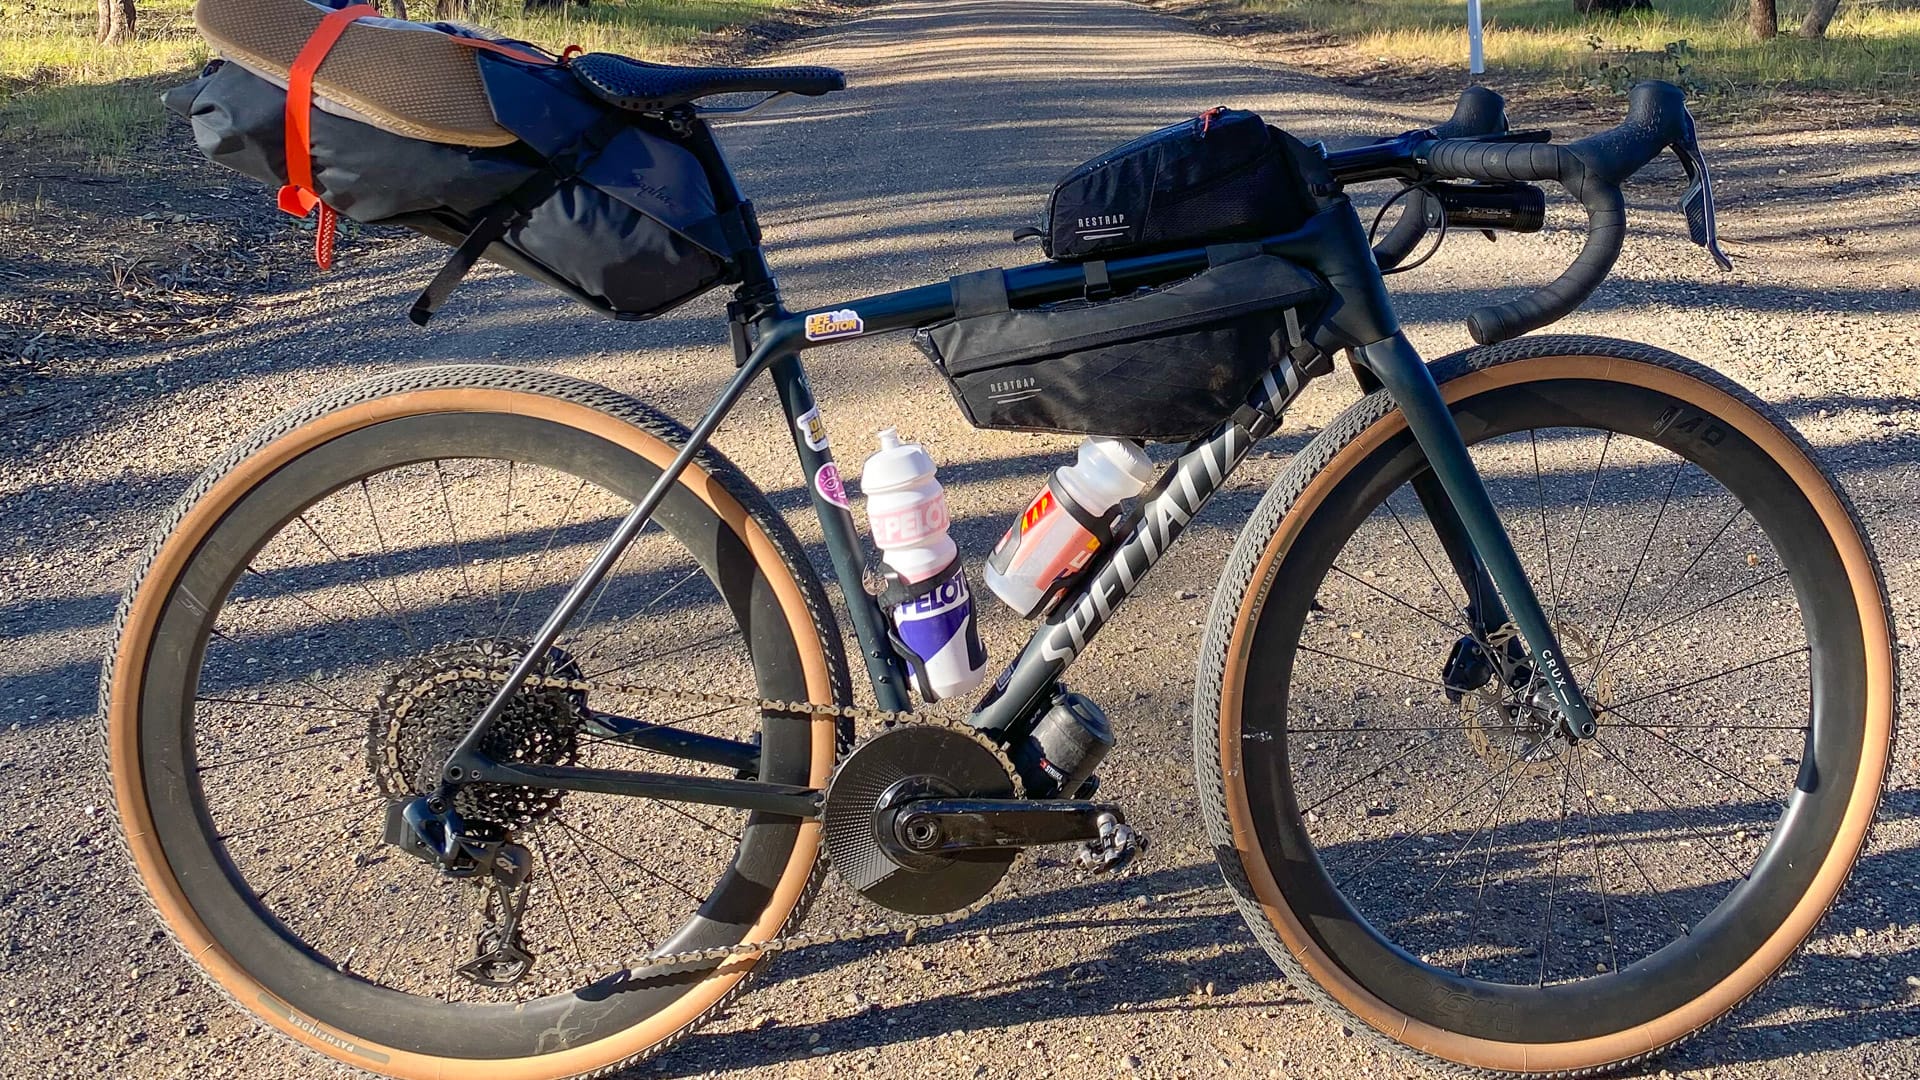
The bike setup. Pack light, travel far (photo credit: Ollie Smith)
How to stay fuelled and hydrated cycling from Melbourne to Sydney?
Food and drink were a real highlight on this bikepacking trip! Australia takes a lot of pride in its food, and I don’t think we had a single bad meal or coffee. Even the sandwiches we had to resort to for dinner on the first night at Avenel’s road house were freshly made, packed with salad, and great value.
On the bike, we fuelled almost exclusively on Allen’s Killer Pythons. These are basically gummy snakes. They’re easy to eat on the bike and pack a lot of carbohydrates without being too bulky to carry. We used water or Maximus (basically Australian Gatorade) for hydration. We also prioritised fuelling properly at breakfast and dinner each day.
Be aware! There are servos, cafes, pubs, and restaurants dotted across the route, but a few of the days were a little sparse. The days to plan for were:
- Day 3 (Whitfield to Myrtleford): Worth carrying extra snacks and topping up whenever you spot a servo or café.
- Day 4 (Bright to Albury): Once you’re past the post office in Tawonga, there isn’t another resupply option until the other end of the valley.
- Day 7 (Tumut to Gunning): Only one or two shops between Tumut and Yass, and we got lucky that the gin distillery in Wee Jasper was open. Of all the days, this is the one to stock up for.
- Day 8 (Gunning to Wollongong): Gunning is tiny with limited resupply, and the first 50km towards Wollongong is sparse. I’d suggest stocking up in Yass the day before and buying enough ride food to cover the first 50 kilometres of the next day, too.
Top tip! Refill your bottles at every opportunity, as we found when a stop presented itself, we were about ready to refill anyway. A good rule of thumb is to never turn down an opportunity to fill up your bottles and grab some food.
What are the must-try Australian food and drink options?
Don’t miss out on trying Chicken Parma (sometimes also called Chicken Parmi or Parmigiana) while you’re bike touring in Australia. It’s a classic pub meal featuring a breaded chicken schnitzel covered in rich tomato sauce, ham, and cheese – grilled, served with chips and salad. It’s a hearty, tasty meal that we enjoyed several times across the trip, and I’d thoroughly suggest you try it!
If you’re partial to a beer, enjoy the schooners. It’s a measurement of beer between a pint and a half that’s pretty hard to find in some places in the world. It’s the perfect amount of crisp, refreshing beer to enjoy after a long, hot, hard day on the bike without tipping you over the edge and leaving you woolly-headed the next morning.
Are there any safety considerations or traffic etiquette to be aware of when cycling in Australia?
Is it mandatory to wear a helmet?
Under Australian road rules, helmet use is mandatory, and you may get a fine if you’re found riding without one (source). Keep that in mind if you usually go cycle touring without a helmet or you’re used to rolling down the roads to the shops without one.
Are cars and other vehicles considerate of cyclists in Australia?
Despite what we’d read online, I thought the standard of car drivers (at least out of the cities) was very high. Cars would routinely move across to another lane completely to overtake us when we were on asphalt.
On the gravel tracks, the few cars we did see would slow right down when passing us to not kick up a dust cloud and blind us. Friendly waves, thumbs up, and cheery smiles were regular occurrences, and on the whole, it felt like a really positive reception.
Do you need to watch out for snakes?
Keep in mind you’re in Australia, so encountering venomous snakes and other poisonous critters is a real possibility.
Be aware! Some of the gravel sections on this Melbourne to Sydney cycling trip take you through long grass, so be aware of disturbing any sleeping brown snakes, as their venom is potent and they’re more likely to strike if they are startled. It’s best to try to make some noise before entering the grassy sections to alert them of your presence and scare them off (source).
Are there any other wildlife to watch out for?
Spring is ‘swooping season’ in Australia for magpies. I got swooped by a few on the day we rode from Wagga Wagga to Tumut.
Top tip! We found that waving your water bottle at them seemed to get them to leave us alone.
What is the cycling infrastructure like in Sydney?
Unlike Melbourne, which we found has excellent cycling infrastructure, including segregated bike paths, we felt the cycling infrastructure in Sydney wasn’t great. Painted bike paths in Sydney tended to randomly disappear or put us on narrow pavements, plus there were so many stops at traffic lights! Be prepared for this to feel a bit hectic after multiple days of remote, quiet riding.
Are there many provisions for cyclists along the Melbourne to Sydney cycling route?
Bike shops were few and far between outside of major towns, to be honest. We were lucky enough not to have any mechanicals, so we didn’t need to hunt one down.
Bright Velo (in, you guessed it, Bright) is a cycling-specific hotel with a pump and basic tools. However, I’d still recommend packing a pump you trust, plus the usual tools and spares you’d need to keep yourself moving on a trip like this.
What’s next?
A huge thank you to Ollie for sharing his experience (and route maps) for cycling from Melbourne to Sydney. Bikepacking across Australia sounds like an incredible way to experience the country’s scenery and hidden gems!
Have you bikepacked Australia, or are you considering it? Comment below to tell us all about it!
Looking for more inspiration for an Australian bikepacking tour or ultra cycling adventure?
Whether you’re keen to meander through the Australian Alps and along the coastal routes as Ollie did, or venture into the Australian Outback, there are so many options to explore this expansive country by bike! Don’t miss:
- Guide to cycling in Sydney for essential tips and the best routes
- Guide to cycling in Melbourne, the sporting and coffee capital, cyclists need to visit!
- The best cycling destinations in Australia for even more Aussie cycling inspiration
- Where to cycle in Victoria, Australia
- Guide to Peaks Challenge Falls Creek, one of Australia’s best known cycling events
Please support Epic Road Rides
A huge amount of time and effort goes into the article you’ve just read, all with the aim of helping you!
If you found what you’ve read useful, I’d really appreciate it if you dropped something in the tip jar here.
It’s a way you can say thank you and help us carry on creating top quality content with no annoying ads and no pay wall.
Looking for an organised cycling trip?
If you want someone to help you plan and book your cycling holiday, fill out this form. We aren’t a tour operator/agent but we work with lots of people who are and will do our best to put you in touch with someone that can help (within 24 hours where possible)!Ollie Smith has been riding bikes his whole life. Aside from racing on the road, gravel, and cyclocross circuit across the UK and Europe, Ollie has tried his hand at ultra racing and plenty of long distance bikepacking trips.
Ollie’s passion for cycling extends to his working life, too, carving a career as a cycling writer, journalist, and film maker - as well as co-producing Mitch Docker’s ‘Life In The Peloton’ podcast. When he’s not in the saddle, you can probably find him thinking about bikes, cycling, and his next two wheeled adventure.
First Published: 15 January 2026
The contents of this website are provided for general information purposes only. It is not intended to amount to advice and you should not rely on it. You should carry out your own due diligence and risk assessments and take professional advice. Views expressed by interviewees or other users of this website do not necessarily represent our views. We make no representations, warranties or guarantees, whether express or implied, that the content on our website is accurate, complete or up to date. If you use any information or content on this website, download from, or otherwise obtain content or services through our website, it is entirely at your own discretion and risk. Epic Road Rides Ltd disclaims all liability and responsibility arising from any reliance placed on the information and content on this website. Find out more here.
Comments